


Applying Erosion to Images with OpenCV: A Complete Guide

Jeremy Morgan 
Mar 30, 2023 - 4 min read
Last Update: Apr 4, 2023

AI changed software development. This is how the pros use it.
Written for working developers, Coding with AI goes beyond hype to show how AI fits into real production workflows. Learn how to integrate AI into Python projects, avoid hallucinations, refactor safely, generate tests and docs, and reclaim hours of development time—using techniques tested in real-world projects.
Welcome fellow computer vision geeks! This tutorial will dive deep into erosion and how it works. We’ll get hands-on with OpenCV.
I aim to make this tutorial fun and easy for beginners to understand. So, let’s get started!
Note: Here’s a link to the full source code.
Looking for Dilation in OpenCV?
Erosion: The Basics
Erosion is a fundamental operation in computer vision and image processing. It’s a technique used to reduce noise and unwanted details from images.
I’ve discussed this on my Computer Vision Power Hour live stream. Image pre-processing is crucial to computer vision. Preparing your images can be just as important or even more important than the model you’re using to analyze them.
Erosion involves shrinking or eroding the boundaries of the foreground objects in the image. It’s instrumental in eliminating small white patches and connecting disjointed or broken parts of objects.
Erosion works with patterns called structural elements, which can be squares or circles. These patterns slide over the original image. When creating the new image, a pixel is set to black (0) if even one pixel in the pattern doesn’t match the original image. However, if all the pixels in the pattern are white, the new image’s pixel will also be white.
Why Use Erosion?
You might be wondering, “Why should I learn about erosion?” Here’s why.
Erosion helps with:
Noise Reduction: Removing slight white noise from images, making them clearer and easier to analyze.
Boundary Extraction: By applying erosion followed by a subtraction operation, you can extract the boundaries of objects in an image.
Disconnecting Objects: Erosion can disconnect objects connected by thin bridges, making it easier to separate and analyze them.
Now that we’ve covered the basics let’s dive into the code.
Getting Started with OpenCV
To start, you’ll need to have OpenCV installed on your machine. If you don’t have it already, here are some great instructions for installing OpenCV.
Once you’ve got OpenCV installed, we can begin our exploration of erosion. We’ll start by importing the required libraries:
import cv2
import numpy as np
import matplotlib
matplotlib.use('TkAgg')
import matplotlib.pyplot as plt
Next, let’s load an image and convert it to grayscale:
image_path = 'images/mustang.png'
image = cv2.imread(image_path, cv2.IMREAD_GRAYSCALE)
Applying Erosion with OpenCV
Applying erosion in OpenCV is a breeze! Here’s how you can do it.
We will start with this image:
You can download it here
It’s a little noisy, and we can use erosion to clean it up for computer vision stuff.
- Create a structuring element using
cv2.getStructuringElement(). You can choose from various shapes likecv2.MORPH_RECT,cv2.MORPH_ELLIPSE, orcv2.MORPH_CROSS.
For this example, we’ll use a 3x3 rectangle.
structuring_element = cv2.getStructuringElement(cv2.MORPH_RECT, (3, 3))
- Apply the erosion operation using
cv2.erode().
eroded_image = cv2.erode(image, structuring_element, iterations=1)
The iterations parameter in incv2.erode() specifies the amount of times the erosion operation should be applied. A higher number of iterations will result in a more eroded image.
- Now that we have our eroded image, let’s display the original and the eroded images side by side for comparison:
import matplotlib.pyplot as plt

plt.figure(figsize=(12, 6))
plt.subplot(121), plt.imshow(image, cmap='gray'), plt.title('Original Image')
plt.subplot(122), plt.imshow(eroded_image, cmap='gray'), plt.title('Eroded Image')
plt.show()
The end result looks like this:
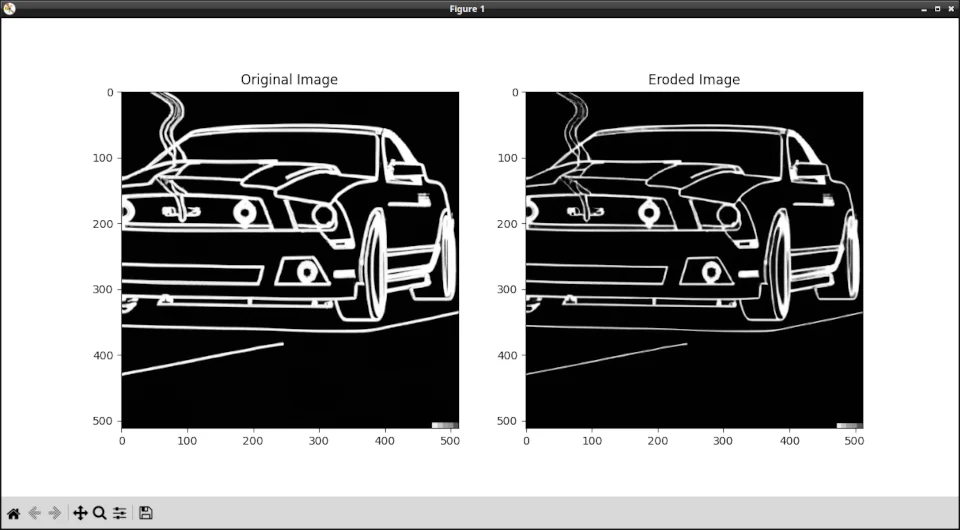
And that’s all there is to it. You’ve successfully applied erosion to an image using OpenCV.
Experimenting with Different Structuring Elements
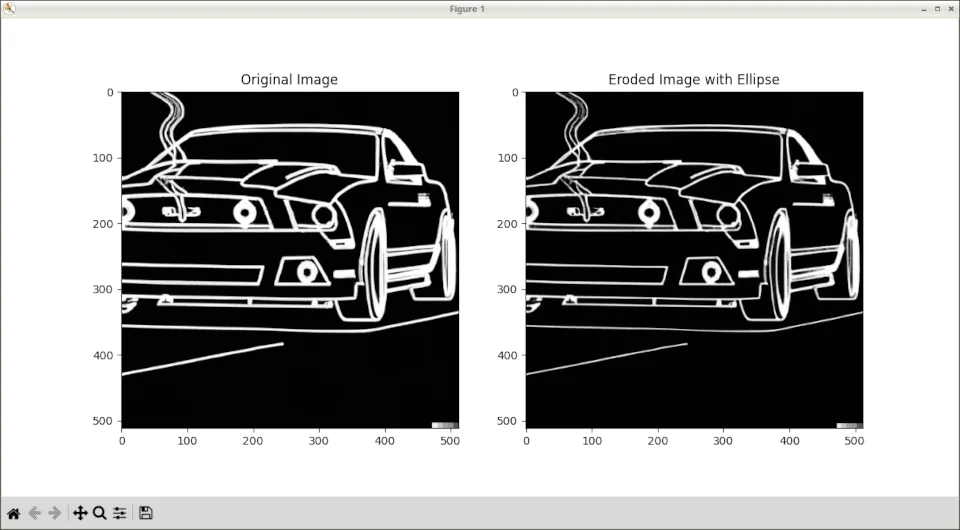
Different structuring elements can yield different results, so it’s worth experimenting to find the best one for your specific use case. Let’s try applying erosion using an elliptical structuring element:
structuring_element_ellipse = cv2.getStructuringElement(cv2.MORPH_ELLIPSE, (3, 3))
eroded_image_ellipse = cv2.erode(image, structuring_element_ellipse, iterations=1)

plt.figure(figsize=(12, 6))
plt.subplot(121), plt.imshow(image, cmap='gray'), plt.title('Original Image')
plt.subplot(122), plt.imshow(eroded_image_ellipse, cmap='gray'), plt.title('Eroded Image with Ellipse')
plt.show()
Here’s how this result looks:
While these may not look different to the naked eye, they will be interpreted differently when passed to classifiers.
Feel free to experiment with different shapes and sizes of structuring elements to see how they impact erosion.
Conclusion
Congratulations! You’ve just learned how erosion works and how to apply it using OpenCV. Now you can confidently use this technique to pre-process images, reduce noise, and extract object boundaries in your computer vision projects. Pre-processing is everything.
Keep exploring the fascinating world of computer vision. This stuff is so fun.
Happy coding, and see you in the next tutorial.
- Jeremy
I have many OpenCV Demos on GitHub you can download and run. I build them on my Computer Vision live streamQuestions, comments? Yell at me!

Skip the hype. The newsletter that keeps you in the know.
AI news curated for engineers. The AI New Hotness Newsletter is what you need.
Zero fluff. Just the research, tools, and infra updates that actually affect your production stack.
Stay up to date on AI for developers - Subscribe on LinkedIn
