


Dilation Demystified: A Complete Guide to Image Dilation with OpenCV

Jeremy Morgan 
Mar 31, 2023 - 5 min read
Last Update: Apr 4, 2023

AI changed software development. This is how the pros use it.
Written for working developers, Coding with AI goes beyond hype to show how AI fits into real production workflows. Learn how to integrate AI into Python projects, avoid hallucinations, refactor safely, generate tests and docs, and reclaim hours of development time—using techniques tested in real-world projects.
Welcome, computer vision geeks! This tutorial is a complete guide to image dilation, a key component for Computer Vision pre-preprocessing. This is important for computer vision because it accentuates features and makes objects more visible in binary images.
Note: Here’s a link to the full source code.
Looking for Erosion in OpenCV?
Dilation: Expanding the Horizons of Image Processing
Before diving in, let’s discuss image dilation and why it’s an essential technique in computer vision. Image dilation is a morphological operation that expands or thickens a binary image’s white regions (foreground). It’s used to fill small gaps, connect disjoint components, or accentuate particular features in an image. In essence, dilation makes image features more prominent and easier for algorithms to process and analyze.
The Mechanics of Dilation
Now that we’ve covered the basics let’s explore the inner workings of image dilation. Dilation is a local operation that compares each pixel in a binary image with its neighbors using a structuring element (also known as a kernel). The structuring element is a small binary matrix that defines the neighborhood of a pixel.
During dilation, the kernel is placed on top of the image, and the central pixel is replaced with the maximum value of its neighbors covered by the structuring element. In binary images, this means that if any of the neighboring pixels is white (1), the central pixel will also become white (1).
OpenCV: The Cornerstone of Computer Vision
OpenCV is a powerful, open-source computer vision library that offers a wealth of tools and techniques for image processing, including image dilation. When paired with Python, a versatile and beginner-friendly programming language, OpenCV becomes an incredibly powerful tool for computer vision tasks.
You can learn more about it with these great OpenCV tutorials.
Let’s Get Dilation Rolling!
To kick things off with image dilation in OpenCV and Python, let’s create a new Python environment:
python -m venv dilationdemo
source dilationdemo/bin/activate
Then, we need to install the OpenCV library. If you haven’t already, you can do this by running the following command in your terminal or command prompt:
pip install opencv-python
With OpenCV installed, let’s jump into the code!
We’re going to use this image in our example:
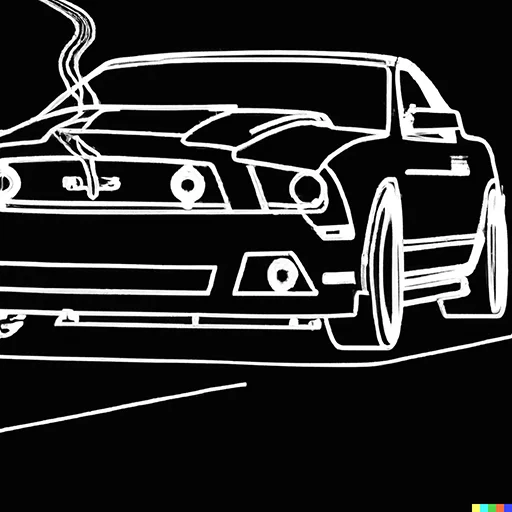
You can download it here
We’ll start by importing the necessary libraries and reading in our binary image.
import cv2
import numpy as np
image = cv2.imread('images/mustang.png', cv2.IMREAD_GRAYSCALE)
Next, we’ll create a structuring element. For this example, we’ll use a 5x5 rectangular kernel. We’ll experiment with different shapes and sizes later.
kernel = np.ones((5, 5), np.uint8)
Now that we have our structuring element, it’s time to perform dilation using OpenCV’s dilate() function:
dilated_image = cv2.dilate(image, kernel, iterations=1)
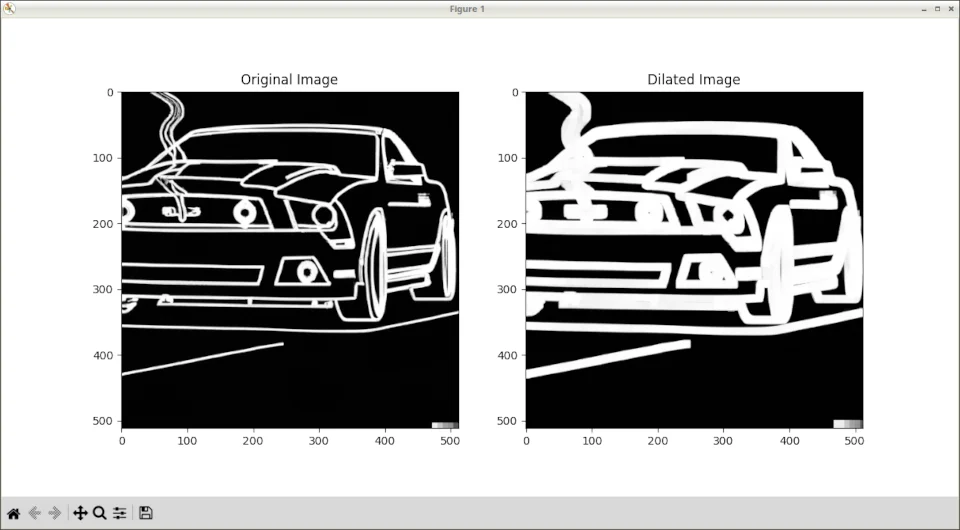
Lastly, let’s display the original and dilated images side by side:
import matplotlib.pyplot as plt
plt.figure(figsize=(12, 6))
plt.subplot(121), plt.imshow(image, cmap='gray'), plt.title('Original Image')
plt.subplot(122), plt.imshow(dilated_image, cmap='gray'), plt.title('Dilated Image')
plt.show()
Now, let’s run the script:
Voilà! You’ve successfully dilated an image using OpenCV and Python.
As you can see, the white lines are much more defined in the second image. You can adjust the thickness of those lines, as you’ll see in the next section.
Adjusting Dilation
You can adjust the dilation by playing around with the matrix size and iterations.
Matrix Size
For example. You can get more of the final details if you adjust the matrix size. A smaller matrix size will have less effect and cover a smaller area. But it’s good for bringing out details:
kernel = np.ones((3, 3), np.uint8)
This isn’t quite as noticeable, because we were already at a fairly small matrix size.
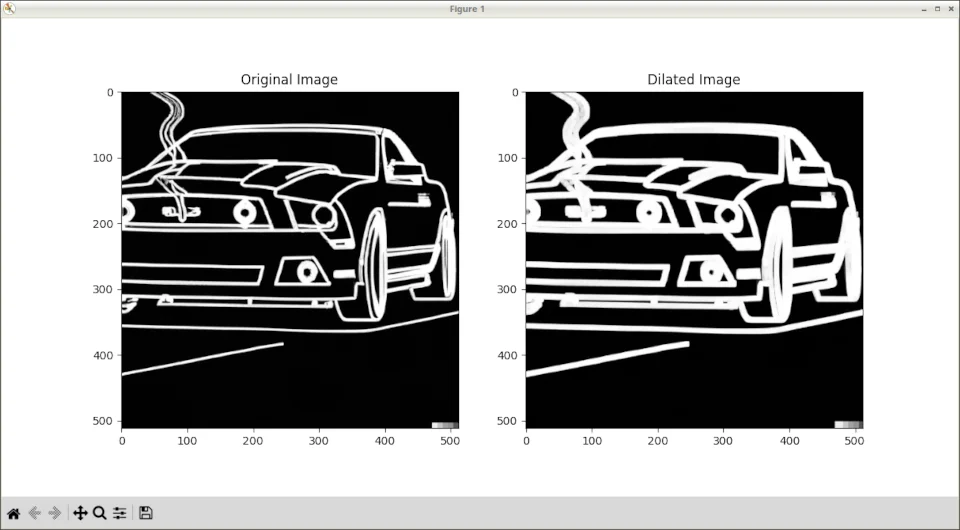
Change it to
kernel = np.ones((9, 9), np.uint8)
Look what happens when we increase it. The finer details aren’t as prominent, and the effect is more significant:
Each of these methods has an advantage depending on your application.
Iterations
You can also change the iterations to amplify the effect.
Change this line of code back to 5x5:
kernel = np.ones((5, 5), np.uint8)
And we see this result again:
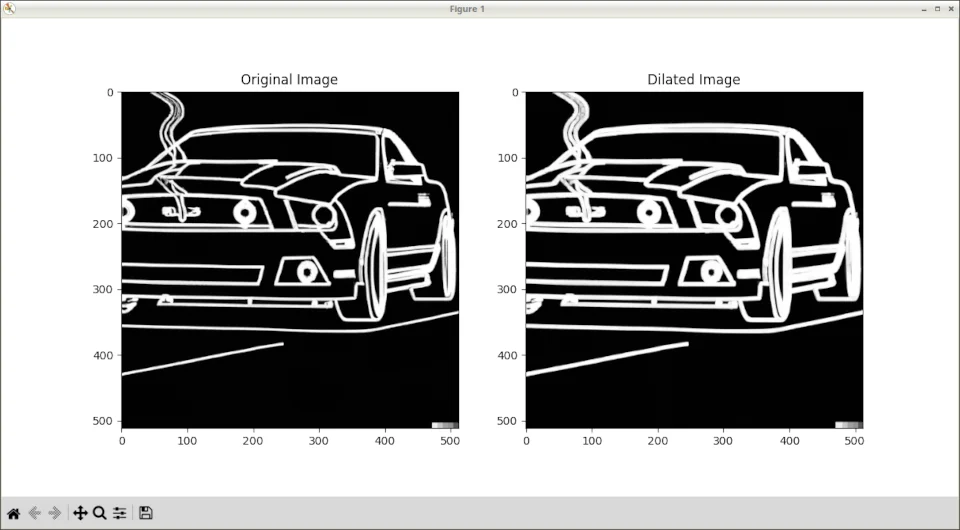
Now increase the iterations to 2:
dilated_image = cv2.dilate(image, kernel, iterations=2)

And you see a more pronounced effect.
These are ways you can fine-tune the images until they work best for you.
Key Takeaways
Image dilation is an operation that expands the white regions in a binary image, helping to accentuate features and make them more prominent for processing and analysis.
The dilation process involves using a structuring element (kernel) to compare each pixel with its neighbors and replace the central pixel with the maximum value of its neighbors covered by the structuring element.
The
dilate()function in OpenCV enables the easy dilation of images with user-defined structuring elements.
Congratulations! You know how to work with dilation in OpenCV and Python. But this is just the beginning. Dilation is a fundamental technique that paves the way for countless other exciting computer vision applications, such as edge detection, feature extraction, and object segmentation.
So, keep exploring and experimenting with different operations and techniques to elevate your computer vision skills.
Bookmark my blog, because I have a lot more OpenCV stuff on here!
Happy coding, and see you in the next tutorial.
- Jeremy
I have many OpenCV Demos on GitHub you can download and run. I build them on my Computer Vision live streamQuestions, comments? Yell at me!

Skip the hype. The newsletter that keeps you in the know.
AI news curated for engineers. The AI New Hotness Newsletter is what you need.
Zero fluff. Just the research, tools, and infra updates that actually affect your production stack.
Stay up to date on AI for developers - Subscribe on LinkedIn
