


Stay Home and Learn JavaScript

Jeremy Morgan 
Mar 24, 2020 - 6 min read
Last Update: Jun 7, 2024

AI changed software development. This is how the pros use it.
Written for working developers, Coding with AI goes beyond hype to show how AI fits into real production workflows. Learn how to integrate AI into Python projects, avoid hallucinations, refactor safely, generate tests and docs, and reclaim hours of development time—using techniques tested in real-world projects.
If you’re quarantined at home and always wanted to learn to code, now’s your chance.
I’ll be creating a series of tutorials designed to take you from “zero to hero” as a React Developer. Before you start with React you should know some JavaScript. Unlike many front end frameworks/libraries React is uses JavaScript patterns extensively. So we’ll cover some JavaScript basics.
In this tutorial, you will learn:
- How to get your first webpage set up
- How to write text to the browser
- How to write text to the console
We will cover some of the basics of JavaScript but won’t get too deep. Some of the content of this tutorial comes from the new JavaScript: Getting Started course by Mark Zamoyta. If you’d like to dig deeper, I would recommend taking it.
What you’ll need to get started
You can use any of the big operating systems for this, Windows, Mac, or Linux. I’ll provide download links for all of them, and the terminal commands should be the same.
For this tutorial you will need:
Git
NodeJS / NPM
Visual Studio Code
Visual Studio Code Install Instructions
You’ll Need to open the terminal
How to open a terminal in Windows How to open a terminal on a Mac How to open a terminal in Linux (will depend on Distribution)
Now that you have all that set up, let’s get started!
Your First Web Page
For our first webpage we’re going to pull down a starter page from the Pluralsight GitHub repo. It’s the Web Dev Starter project.
From a terminal, create a projects folder.
mkdir projects
And then we want to clone in the new project:
git clone https://github.com/pluralsight/web-dev-starter.git
Then go into the project folder:
cd web-dev-Starter
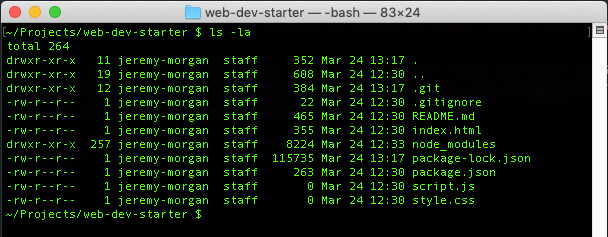
If you type in (dir) in windows, or (ls -la) in OSX or Linux you will see the files listed:
In here we want to install all the packages related to the project. We do that by running the following command:
npm install
Npm uses package.json to find out which packages to install for the website.
one of the things it installs is the lite-server package so you can host html/css/javascript from a small server on your machine, which will be perfect for what we’re going to do.
Now start up the server. To do that, type in
npm run start
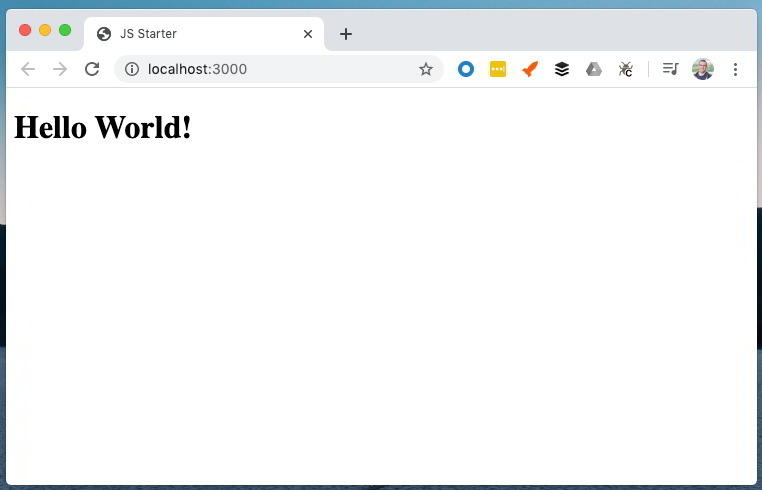
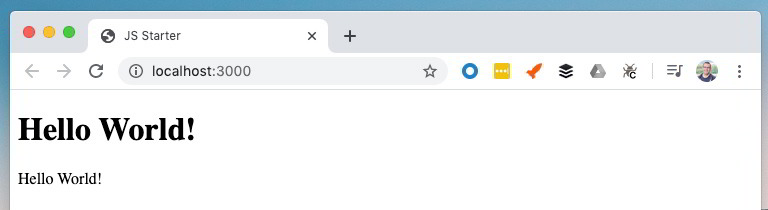
Now if you load up your browser at http://localhost:3000 (it may pop up automatically) you should see this:
Now, you’re ready to develop. However, the “hello world” in this case isn’t actually coming from JavaScript. So let’s change that.
Writing Messages to the Browser
There are a few ways we can write messages to our browser:
- Replace data within an getElement
- Write it to the document directly
- Write it to the console
So I’ll demonstrate how each of those work.
1. Replace Data within an element
Open up index.html, and you’ll see the main code for the web page. You can see where “Hello World” comes from, and you can see a reference to script.js.
<body>
<h1>Hello World!</h1>

<script src="script.js"></script>
</body>
Let’s make some changes. Change your H1 so it looks like this:
<h1 id="banner">Hello World!</h1>
We’re adding in an “ID” to this element so we can reference it and change it with JavaScript.
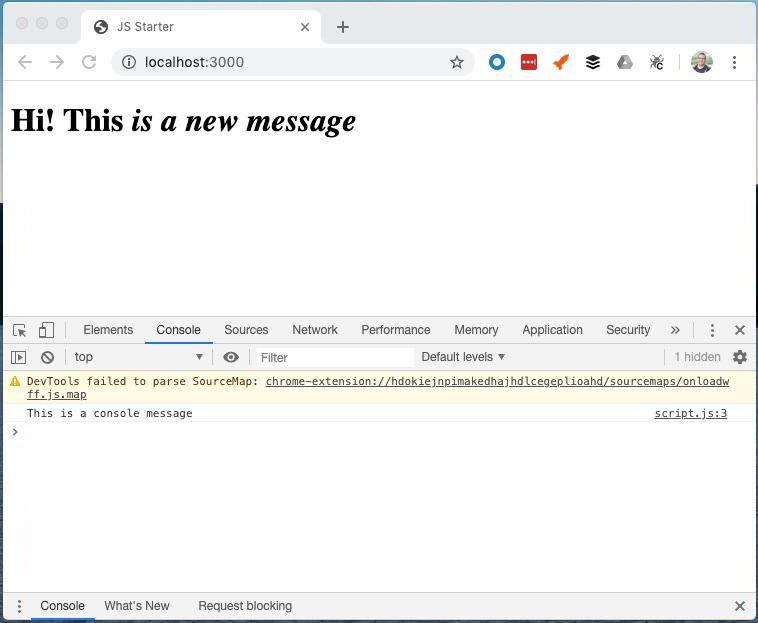
Open up script.js in your project, and add the following code:
document.getElementById("banner").innerHTML = "Hi! This is a new message"
This opens the document (index.html) then uses “getElementById” to load an element with the ID of “banner” and overwrite it with your message. Save the file and you should see this:
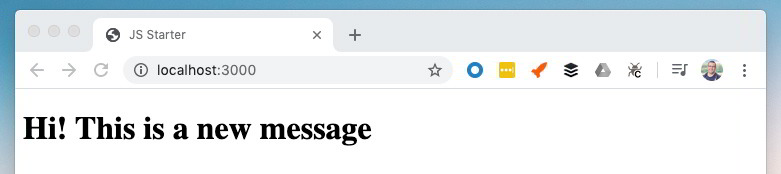
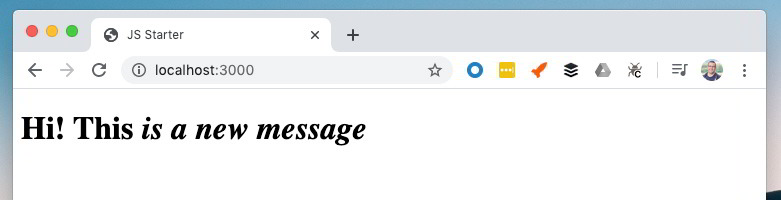
Now, you’re truly writing to the browser with JavaScript. It took the existing message (“Hello World”) that was in the H1 and replaced it with your custom message. You may have noticed the property’s name is innerHTML so yes, you can inject HTML into it as well:
2. Write to the document directly
There are other ways to write something to the browser with JavaScript. The “old school” way do this is document.write, which I don’t recommend, but it still works. It’s great for testing, but not in applications.
Replace the line in script.js that you just added, and change it to this:
document.write("Hello World!");
It will produce this:
Now you’ll see the “Hello world” that was displayed in the H1, and the Hello World from document.write. One good use for Document Write is when you want to display the value of a variable to the screen for debugging. But here’s how I do most of my debugging, the console log*.
3. Write it to the console
In your browser you have a console, that’s not viewable when you’re browsing websites, but you can turn it on to view what’s happening in the background. It’s like a “backdoor” to your web page.
If you don’t know how, here is how you can access your browser’s developer console
To write to your console we’ll use console.log. It’s a great way to:
- display “we got here messages”
- output the value of variables
- display objects
Let’s try it out. In script.js add the following:
console.log("This is a console message");
Save the file, and with your console open, you should see something like this:
Look at that! You have written to the console!! This is an excellent tool for debugging.
So why does this matter?
So now we’ve learned a few ways to write data to the browser. But why does that matter? Isn’t that what an application does for us? Yes and no.
When you start debugging programs, you need a way to write values to a browser.
I’ll show you an example, using variables.
add this to your index.html:
<label for="yearborn">Enter the year you were born:</label>
<input type="text" id="yearborn" />
<button onclick="calculateAge()">Calculate Age</button>
<h1 id="banner"></h1>
Change your script.js to look like this:
// current year
let year = 2017;

function calculateAge(){

    let yearBorn = document.getElementById("yearborn").value;

    let age = year - yearBorn;
    let age2 = (age - 1);

    document.getElementById("banner").innerHTML = "You are " + age + " or " + age2 + " years old";

}
And reload your web page. Enter the year you were born.
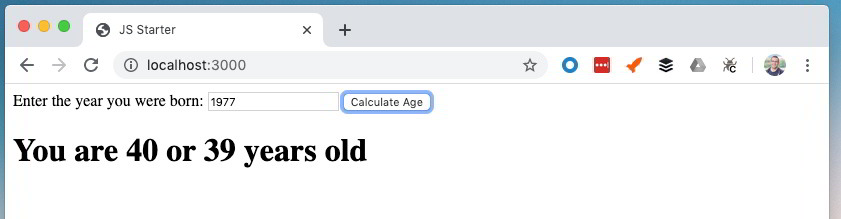
I enter the year, and that doesn’t seem right. I am 42 years old. I suspect there may be something wrong with the calculation. So let’s pretend we don’t know where the year is coming from. Enter this line into script.js:
console.log("Current year is " + year);
And reload the browser:

That’s it! I can see in our console we are using the wrong year for calculation.
That’s the value of writing to the browser/console.
Yet another way to write to the Browser
Another thing you can do is pop up a dialog. In intro.js right below the line where you put console.log, add this line:
alert("Current year is " + year);
Save the file and reload the website. You will see this:
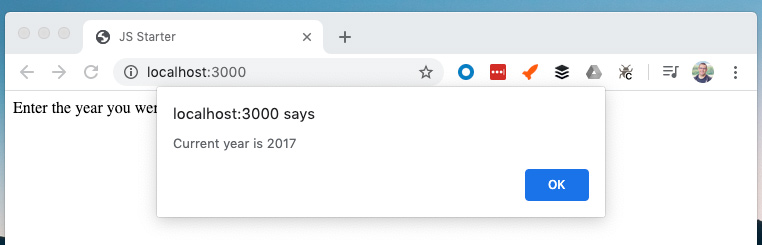
Alert pops up a dialog box to show you whatever values you put in the parenthesis. It’s a handy way to pop up messages to your visitors, but we warned: it is annoying, and it can be blocked. So don’t rely on it.
Conclusion
Writing “Hello World” to output is the standard for getting started in any language. We’ve done that here, and we’re just getting started.
You need to know how to output data to a browser for debugging and communicating with your visitors.
Next we’ll take a look at variables, what they are and how to use them with JavaScript.
Questions, comments? Let me know!

Skip the hype. The newsletter that keeps you in the know.
AI news curated for engineers. The AI New Hotness Newsletter is what you need.
Zero fluff. Just the research, tools, and infra updates that actually affect your production stack.
Stay up to date on AI for developers - Subscribe on LinkedIn