


Image Blending Uncovered: A Guide to Blending Images with OpenCV

Jeremy Morgan 
Mar 23, 2023 - 5 min read
Last Update: Apr 4, 2023

AI changed software development. This is how the pros use it.
Written for working developers, Coding with AI goes beyond hype to show how AI fits into real production workflows. Learn how to integrate AI into Python projects, avoid hallucinations, refactor safely, generate tests and docs, and reclaim hours of development time—using techniques tested in real-world projects.
Welcome, friends, to another tutorial about Computer Vision and OpenCV. How do you blend two images together? Can you blend one more than the other? You’ll learn all of this here today. If you are dipping your toes into computer vision, this tutorial will make image blending fun and easy. Let’s explore how to blend two images with OpenCV and Python.
If you want to go straight to the code click here
Image Blending: A Harmonious Union of Images

Before we go into the details, let’s discuss image blending and why it’s so important. An image blend is created by combining two or more images. This process can be used for various applications, such as constructing panoramas, blending faces, or generating artistic compositions. By blending images, we can extract valuable information, create compelling visual effects, and develop innovative computer vision solutions.
How Image Blending Works
Here is the underlying theory behind image blending. An image is blended by calculating a weighted average of the pixel intensities in the image. Here’s what it looks like in code:
blended_pixel_value = alpha * pixel_value_1 + beta * pixel_value_2 + gamma
Here, alpha and beta are the weights assigned to the pixel intensities of the input images, and gamma is an optional offset value. The alpha and beta sum should equal 1 to maintain the overall intensity levels in the blended image.
You can adjust this if you like. We’ll do that in this tutorial.
OpenCV and Python: A Powerful Duo
OpenCV is an open-source computer vision library that provides a wide range of tools and techniques for image processing, including image blending. It’s awesome, and I love working with it. It’s saved me a lot of time on projects, and I’m just now getting into the more complex features. It’s amazing.
Combined with Python, a versatile and beginner-friendly programming language, OpenCV becomes a powerful tool for computer vision tasks.
Let's Blend Some Images!
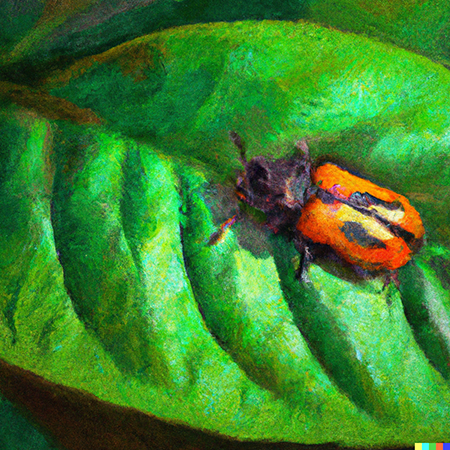
We will blend this image:
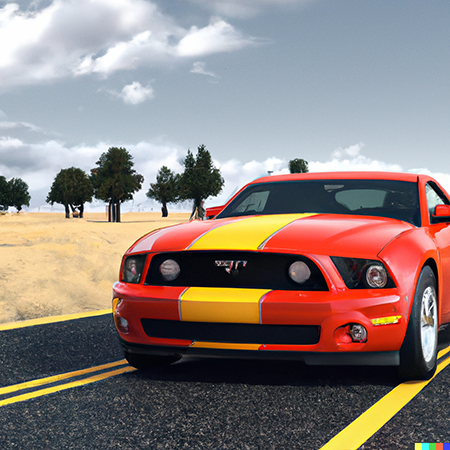
With this image:
Let’s try it out.
To begin blending images with OpenCV and Python, we need to install the OpenCV library. If you haven’t already, you can do this by running the following command in your terminal or command prompt:
pip install opencv-python
With OpenCV installed, let’s dive into the code! We’ll start by importing the necessary libraries and reading in our two input images.
import cv2
image1 = cv2.imread('bug.png')
image2 = cv2.imread('mustang.png')
Next, we’ll define the blending parameters, alpha, beta, and gamma. We’ll use equal weights for both images and no offset value for this example.
alpha = 0.5
beta = 0.5
gamma = 0
Now it’s time to blend the images using OpenCV’s addWeighted() function:
blended_image = cv2.addWeighted(image1, alpha, image2, beta, gamma)
The addWeighted() function takes five parameters:
- The first input image, ‘image1’ in this case.
- The weight of the first image, ‘alpha’ in this case.
- The second input image, ‘image2’ in this case.
- The weight of the second image, ‘beta’ in this case.
- The scalar value added to each pixel after the weights have been applied, ‘gamma’ in this case.
This function will blend our images together exactly as we specified.
Let’s display the input images and the blended image:
cv2.imshow('The Bug', image1)
cv2.imshow('The Mustang', image2)
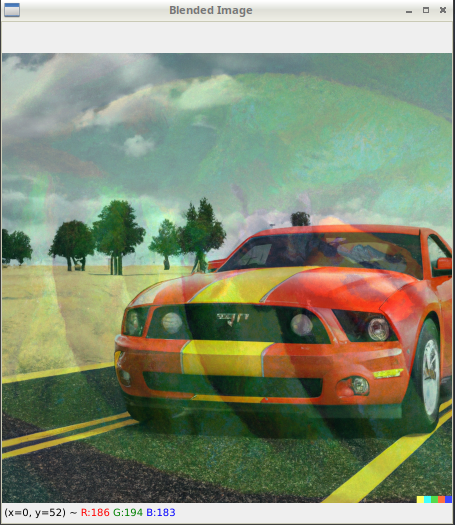
cv2.imshow('Blended Image', blended_image)
Then we’ll Wait for a key press and close the windows
cv2.waitKey(0)
cv2.destroyAllWindows()
Ok, let’s run it:
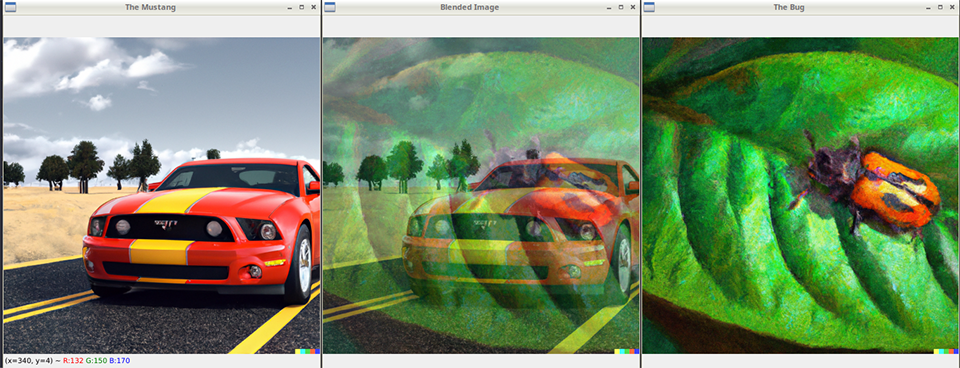
As you can see, we’ve blended the image of the Mustang and the bug perfectly. Awesome right?
Congratulations! You’ve successfully blended images using OpenCV and Python.
But what if we want one image to be more prominent than the other?
Changing the Blending Parameters
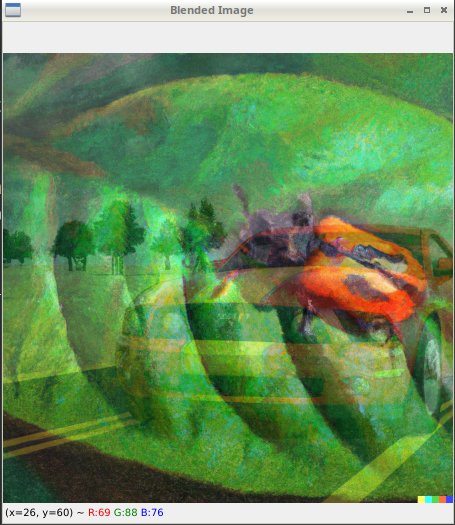
If we want more of the bug to show, say 70%, we’ll adjust the alpha parameter to be higher, like this:
alpha = 0.7
beta = 0.3
We run it, and it looks like this:
If we want more of the Mustang to show, we’ll adjust the beta parameter to be higher, like this:
alpha = 0.3
beta = 0.7
Now the image comes out like this:
You can adjust these parameters however you’d like. Congratulations, you’ve now blended two images with OpenCV and Python.
Key Takeaways
Image blending combines two or more images to create a new, harmonious image, with applications in panoramas, face blending, and artistic compositions.
The underlying theory involves calculating a weighted average of pixel intensities from the input images to create a composite image using blending parameters alpha, beta, and gamma.
OpenCV and Python offer a powerful and accessible platform for image blending and other computer vision tasks.
The addWeighted() function in OpenCV allows for easy blending of images with user-defined blending parameters.
You’ve now mastered the art of image blending using OpenCV and Python! But the adventure doesn’t end here. Image blending is a fundamental skill that opens the door to countless other exciting computer vision applications, such as image stitching, seamless cloning, and advanced image editing. So, keep exploring and experimenting with different blending techniques to elevate your computer vision skills.
Happy coding, and see you in the next tutorial.
- Jeremy
I have many OpenCV Demos on GitHub you can download and run. I build them on my Computer Vision live streamQuestions, comments? Yell at me!

Skip the hype. The newsletter that keeps you in the know.
AI news curated for engineers. The AI New Hotness Newsletter is what you need.
Zero fluff. Just the research, tools, and infra updates that actually affect your production stack.
Stay up to date on AI for developers - Subscribe on LinkedIn
