


How to enable CUDA with OpenCV in Arch Linux

Jeremy Morgan 
Apr 7, 2023 - 6 min read
Last Update: Apr 7, 2023

AI changed software development. This is how the pros use it.
Written for working developers, Coding with AI goes beyond hype to show how AI fits into real production workflows. Learn how to integrate AI into Python projects, avoid hallucinations, refactor safely, generate tests and docs, and reclaim hours of development time—using techniques tested in real-world projects.
Hello friends, this tutorial is ultra specific. However, if it helps one person it’s worth writing.
I spent most of a day trying to get OpenCV to use CUDA with my NVIDIA 4080. Yeah, really. I found tons of answers that for some reason didn’t apply to me in one way or another. Tried and failed and pieced things together and made it happen.
So if you have an NVIDIA Card and want to use the GPU to work on OpenCV instead of a CPU, you’re in luck. If you have a 4080 or 4090 you can just copy and paste, build, and be done. You have to tweak things a bit for other cards.
Step 1: Before You Start, TRY THIS
Now, the very first thing I tried was:
sudo pacman -S opencv-cuda
This is a binary build of OpenCV with Cuda support, and I couldn’t get it to work for one reason or another.
But lots of people have, so you might be able to. Try installing with pacman, and then create a Python file that looks like this:
import cv2

print("OpenCV version:", cv2.__version__)
print("CUDA supported:", cv2.cuda.getCudaEnabledDeviceCount() > 0)
then run
pip install opencv-python
If you run it and see this:

Then you are done. Close this webpage and enjoy.
But since you’re reading this tutorial, I’m guessing you already tried that and it didn’t work. We’re going to compile OpenCV from source and optimize it for the GPU.
Let’s jump in.
Step 2: Install Python 2
Yeah, I know it’s a little weird. I have Python 3 installed and that’s what I use every day. But I couldn’t get it to compile without Python 2 being present. You can install this from the AUR; it shouldn’t affect anything you do.
First, add this key:
gpg --keyserver keyserver.ubuntu.com --recv-key 04C367C218ADD4FF
Then clone the AUR
git clone https://aur.archlinux.org/python2.git && cd python2
and install it.
makepkg -si
You never know, it may still come in handy. On to the next part.
Step 3: The Prerequisites
These are a set of prerequisites for compiling OpenCV from source. Yes, I know python-opencv is in there, and we’re replacing it, but it needs to be in place to build your custom version of OpenCV. Don’t ask me why.
sudo pacman -S base-devel cmake git python python-numpy python-opencv openmpi python-mpi4py boost
Step 5: The NVIDIA Stuff
If you have an NVIDIA card (like I do) here is what you need to install. You may have this stuff already. Thankfully you don’t need to compile the NVIDIA stuff by hand.
sudo pacman -S nvidia nvidia-utils nvidia-settings cuda
After this, you’re just about ready to compile. Next, you have to create your CMAKE commands.
Step 6: Figure Out What You have
If you have an NVIDIA 4080 you can skip this section and copy my code. If not, here’s how to check which video card you’re running:
lspci -v | grep VGA

This shows I’m running a GeForce RTX 4080. Great! I’ll need this information.
Find the video card you’re using. If it’s an NVIDIA card, you find out which CUDA version you’re running here.
If you don’t see your card, you may be able to find it here.
You need to find out what version of CUDA your card supports. I have a 4080, so I needed 8.9. Which we’ll see why that’s relevant in the next section.
Note: You’ll need to know what version of CUDA your card supports.
Step 7: Grab the OpenCV Repos
Here are the two repos you will need:
git clone https://github.com/opencv/opencv.git
git clone https://github.com/opencv/opencv_contrib.git
We will link the contrib folder in our CMAKE configuration.
I do all my source building in a ~/src folder. But here is the layout I have:
/src/opencv
/src/opencv_contrib
Then I create a “build” folder:
/src/build
And this is the folder I build OpenCV in. This is an “out of source build” and works well for me. You can delete everything if something doesn’t work and run CMAKE differently.
Step 8: CMAKE flags
Next, you need to set your CMAKE flags. Here’s the type of install I built:
OpenCV with:
- CUDA Stuff
- Some OpenCV examples
- No Docs
- No Tests
- OpenCL
- FFmpeg
- Stuff built just for my Video Card.
So I’ll walk you through my CMAKE build with the final one at the end.
First the initial command. I want this to be a release build, in /usr/local:
cmake -D CMAKE_BUILD_TYPE=RELEASE
-D CMAKE_INSTALL_PREFIX=/usr/local \
This one is just to help it find the OpenMP library.
-D CMAKE_PREFIX_PATH=/usr/lib \
Add in our extra modules:
-D OPENCV_EXTRA_MODULES_PATH=../opencv_contrib/modules \
and of course, enable CUDA.
-D WITH_CUDA=ON \
This part is particular to my NVIDIA card (RTX 4080). Again you can find which CUDA version you should target here
-D CUDA_ARCH_BIN=8.9  \
-D ARCH=sm_89  \
-D gencode=arch=compute_89,code=sm_89  \
Then, my configuration for OpenCV. I’m optimizing as much as I can, adding OpenCL and FFMPEG, and not building any documentation or tests. Feel free to tweak these however you want.
-D ENABLE_FAST_MATH=ON  \
-D CUDA_FAST_MATH=ON  \
-D WITH_CUBLAS=ON  \
-D WITH_CUFFT=ON  \
-D WITH_NVCUVID=ON  \
-D WITH_OPENMP=ON  \
-D BUILD_EXAMPLES=ON  \
-D BUILD_DOCS=OFF  \
-D BUILD_PERF_TESTS=OFF  \
-D BUILD_TESTS=OFF  \
-D WITH_TBB=ON  \
-D WITH_IPP=ON  \
-D WITH_NVCUVID=ON  \
-D WITH_CSTRIPES=ON  \
-D WITH_OPENCL=ON  \
-D WITH_FFMPEG=ON  \
-D CMAKE_PREFIX_PATH=/usr/lib  \
This is just a CPU Optimization flag. It’s probably not even necessary.
-D CMAKE_CXX_FLAGS="-Ofast" \
Lastly, you grab OpenCV:
../opencv
Here is my final CMAKE command:
cmake -D CMAKE_BUILD_TYPE=RELEASE
-D CMAKE_INSTALL_PREFIX=/usr/local \
-D CMAKE_PREFIX_PATH=/usr/lib  \
-D OPENCV_EXTRA_MODULES_PATH=../opencv_contrib/modules  \
-D WITH_CUDA=ON  \
-D CUDA_ARCH_BIN=8.9  \
-D ARCH=sm_89  \
-D gencode=arch=compute_89,code=sm_89  \
-D ENABLE_FAST_MATH=ON  \
-D CUDA_FAST_MATH=ON  \
-D WITH_CUBLAS=ON  \
-D WITH_CUFFT=ON  \
-D WITH_NVCUVID=ON  \
-D WITH_OPENMP=ON  \
-D BUILD_EXAMPLES=ON  \
-D BUILD_DOCS=OFF  \
-D BUILD_PERF_TESTS=OFF  \
-D BUILD_TESTS=OFF  \
-D WITH_TBB=ON  \
-D WITH_IPP=ON  \
-D WITH_NVCUVID=ON  \
-D WITH_CSTRIPES=ON  \
-D WITH_OPENCL=ON  \
-D WITH_FFMPEG=ON  \
-D CMAKE_PREFIX_PATH=/usr/lib  \
-D CMAKE_CXX_FLAGS="-Ofast"  \
../opencv
It’s time to rock and roll. Note, you can also use cmake-gui to configure this:
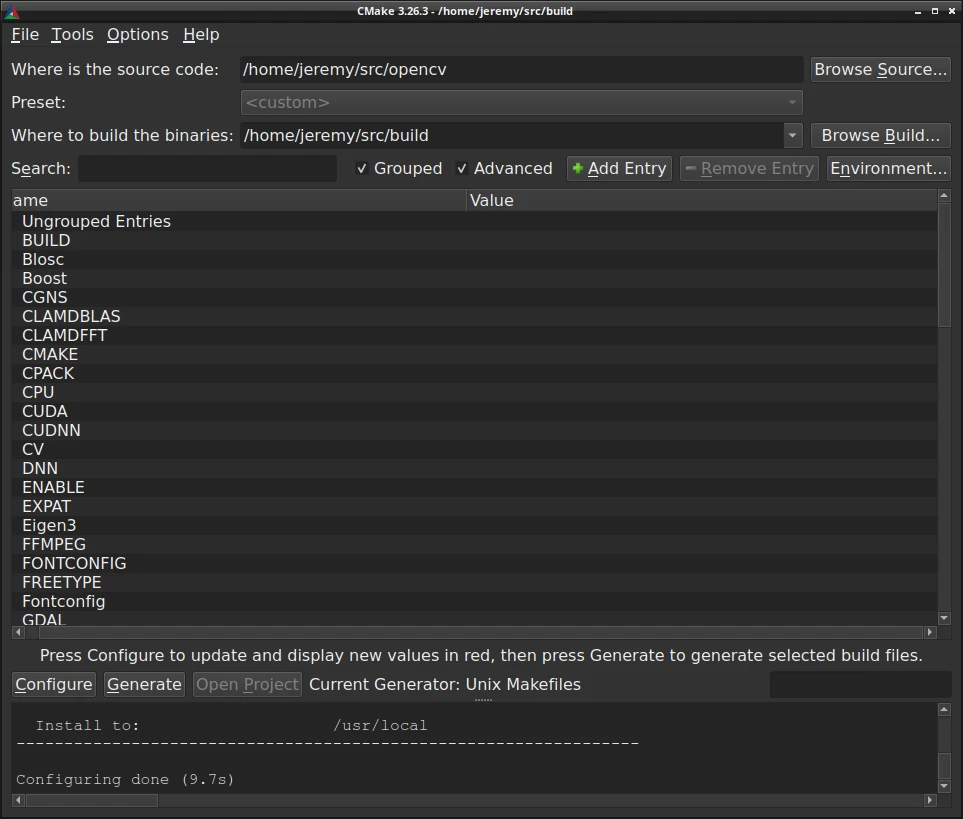
I decided not to this time because I prefer to edit a shell script and iterate with that. The GUI is nice though.
Step 9: Build It!
If you have everything selected and there are no errors with your CMAKE configuration, it’s time to build. Simple command:
make -j$(nproc)
If things go well, you should see this:
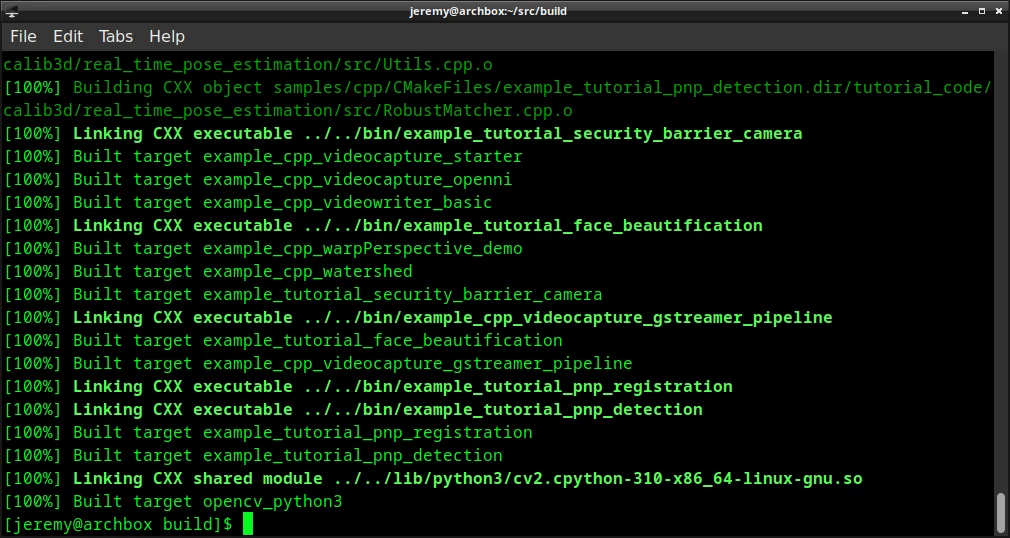
Now it’s time to install!
sudo make install
And now, you should see this:
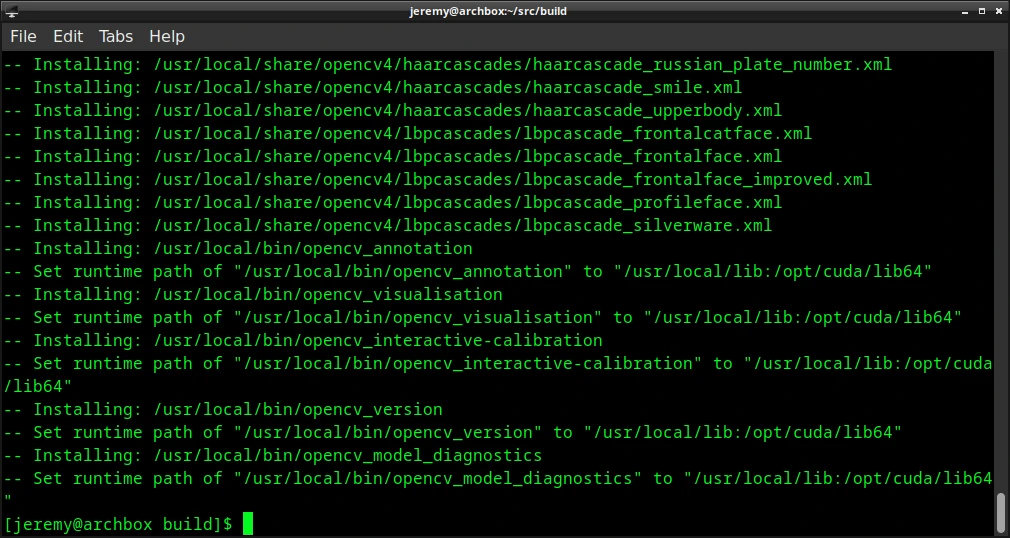
This is great. Partytimeexcellent.
Finally you need to add the new OpenCV to your Python Path:
export PYTHONPATH="/usr/local/lib/python3.10/site-packages:$PYTHONPATH"
Note, for me, it was python3.10. It may be different for you. You’re done! Let’s make sure it works.
Step 10: Test The Installation
Now, create a Python file that has this:
import cv2

print("OpenCV version:", cv2.__version__)
print("CUDA supported:", cv2.cuda.getCudaEnabledDeviceCount() > 0)
And you should see this:
Good times!
Conclusion
Like I said, I spent most of the day on this. It was a huge pain, so I put this together so you don’t have to suffer as I did. I hope it helps!
Bookmark my blog because I have a lot more OpenCV stuff on here!
Happy coding, and see you in the next tutorial.
- Jeremy
I have many OpenCV Demos on GitHub you can download and run. I build them on my Computer Vision live streamQuestions, comments? Yell at me!

Skip the hype. The newsletter that keeps you in the know.
AI news curated for engineers. The AI New Hotness Newsletter is what you need.
Zero fluff. Just the research, tools, and infra updates that actually affect your production stack.
Stay up to date on AI for developers - Subscribe on LinkedIn