How to Learn C# Part 1 - Introduction
Last Update: Jun 7, 2024
I wrote a book! Check out A Quick Guide to Coding with AI.
Become a super programmer!
Learn how to use Generative AI coding tools as a force multiplier for your career.
This tutorial is part of a series. You can see the other tutorials below:
| Beginning C# |
|---|
| 1. Introduction |
| 2. Namespaces |
| 3. Coding Basics |
| 4. Variables and Types |
| 5. Selection Statements |
| 6. Iteration Statements |
Ok so a few months ago I posted an intro to C# and the .Net framework and talked about a set of tutorials, and here they are. I’m going to jump right into coding and explore a working application. C# is my favorite language, and after a while of using it you’ll see why.
The previous article was basically an intro and reasoning behind why you should use C#, this is more practical hands on stuff. We’ll start with hands-on code and move on to how to use it.
Note that this tutorial is for the absolute beginner, if you’ve had experience with other Object Oriented Languages you may want to skim this one and move on the to the next.
What you need to get started.
To get started you won’t need much. All the tools we’re using here are free of charge, but if you have a pro copy of Visual Studio that’s great.
You will need:
- Microsoft .Net Framework 4.0 or greater - Download it here
- Visual Studio Express 2012 - Download it Here
- A text editor. You can use any editor you like, I prefer Notepad++ - Download it Here
All of these downloads are 100% free - no trial or anything like that so you can really take off and run with this stuff. As you become a professional developer or build commercial products you’ll want the professional version of Visual Studio, but for now this works great.
Get Set Up
For these tutorials we’re going to doing it the hard way. We’re going to code everything by hand in a text editor then compile it. The reason for this is we want to learn how the code actually works, for professional development you need an IDE, but your foundation will be much stronger if you know how everything works intimately.
Step 1 - Create a folder to put your files in. This can be anything you like, such as C:\csharp whatever’s easiest for you.
Step 2 - Create a path to compiler (or choose the Visual Studio Command Prompt). You have two options here, you can either:
Select Start->Programs->Microsoft Visual Studio Express 2012->Visual Studio Tools -> Developer Command Prompt (the easy away)
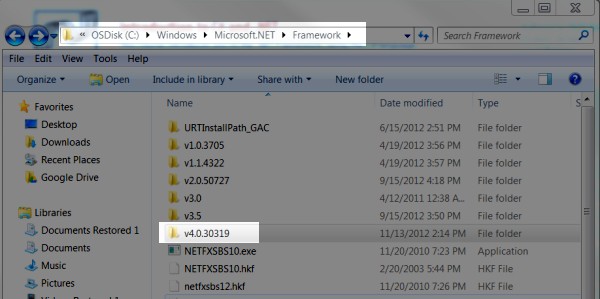
Or, you can find the path to CSC, it’s located in
C:\Windows\Microsoft.NET\Framework[version]

So to set your path, you should type in:
set PATH=%PATH%;C:\Windows\Microsoft.NET\Framework\v4.0.30319
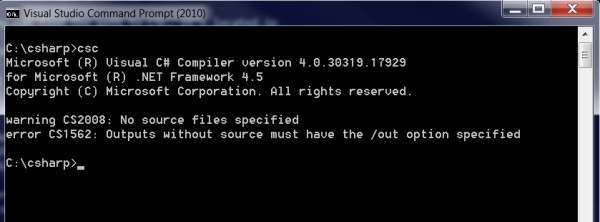
The version may change but that one corresponds to the image above. You should be able to type in “csc” anywhere and see something like the following:

Now you’re ready to get started
Let’s Write Some Code!
I hate to be cliche’ but this really is the best way to start any programming tutorial, so we’re gonna do a “hello world” app. Create a file called helloworld.cs and type in the following:
namespace HelloWorldApp
{
	class Program
	{
		static void Main()
		{
			System.Console.WriteLine("Hello, World!");
		}
	}
}
Now, save the file and type:
csc helloworld.cs
You should get a message that looks like:
Microsoft (R) Visual C# Compiler version 4.0.30319.17929
for Microsoft (R) .NET Framework 4.5 Copyright (C) Microsoft Corporation. All rights reserved.
This creates an executable called helloworld.exe that you should output the text you’ve specified.
Type in:
helloworld
and you’ll see the output. Easy right? Now I’ll explain a little more about what this app is doing.
How it works
The first thing you’ll notice the program starts with this:
namespace HelloWorldApp
A namespace is a keyword that declares the scope of your types. Scope is basically a fenced off area where your data resides. This associates your variables and other data types with your program and controls access to them.
HelloWorldApp is your namespace for your program, but the .Net Framework also uses namespaces to organize code as well. For example the System.IO namespace contains code pertaining to input and output. Your applications can utilize many namespaces, in fact they will always utilize more than one.
If you’d like to read more about namespaces see the namespace reference on MSDN. We’ll be talking about them more later too.
The next part of the program is:
class Program
This also contains a set of brackets and everything within them belongs to the class “Program”. A class is a contruct that acts as a template for objects. It defines a set of functions and is used for organizing your code in an efficient way.
A class creates an instance of itself for a given purpose. Think of it as a blueprint for data, it specifies what data goes in, what goes out (if anything) and what methods you can perform on the data. For information about the theory behind classes check out my intro to object oriented programming.
Next we come to this statement:
static void Main()
This creates an entry point for our program. Main() is where every program starts, and is required for any C# application. The keyword static means this is a variable that is created statically mean it lives throughout the life of the program. Variables that are declared dynamically have a shorter life and are created and destroyed as needed. Since we need this data throughout the whole program we want it to be static. There are other uses for static datatypes we’ll get into later.
The word “void” indicates no data will be returned by this method. Methods that process data will return data and this keyword specifies that format. Since all of our data is going to console output we don’t need to return anything.
The next line is our actual output.
System.Console.WriteLine("Hello, World!");
This uses the method WriteLine in the System.Console namespace (sound familiar) to output a string to the console. It works exactly the way you see it, by taking the string “Hello World” and passing it to the WriteLine function it displays as output.
I call this method explicitly, but it’s not the only way to do it. We can include the System namespace with the “using” keyword and then call out the Console.WriteLine method directly. See the code below:
using System;

namespace HelloWorldApp
{
	class Program
	{
		static void Main()
		{
			Console.WriteLine("Hello, World!");
		}
	}
}
Do you see the difference? This is usually a cleaner way to do it, especially if you’re using multiple methods from the System namespace. When it comes to code, you should always optimize for readability.
I hope this was a good explanation of our small application and you understand how everything works.
Let’s Change it Up: Ask For Input
Now we’re going to change our app a little to get some user input. Make a new copy of your app or change the existing one so it looks like this:
using System;

namespace HelloWorldApp
{
	class Program
	{
		static void Main()
		{
			Console.Write("Please Enter Your Name: ");
			Console.Write("Hello there {0}! ", Console.ReadLine());
		}
	}
}
Now as you can see, we have two lines and the first one outputs a string asking for your name. The next line also outputs a string but as you can see we have some new stuff here. We create a placeholder ({0}) then make a call to the Console.ReadLine() method. This does exactly what you’d guess and reads the input from the console. The program will pause until you enter something at the prompt. Type csc (filename) and try it out.
Type the following code into your app:
using System;
using System;

namespace HelloWorldApp
{
	class Program
	{
		static void Main(string[] args)
		{
			Console.WriteLine("You passed {0} as an argument", args[0]);
		}
	}
}
You can also take command line arguments as input, as this example does. Notice the difference in our Main() declaration
static void Main(string[] args)
This tells the compiler that we expect an argument or arguments to be passed to the executable. When the Console.WriteLine method executes, it will display what you typed as an argument.
Console.WriteLine("You passed {0} as an argument", args[0]);
Again we’re using {0} as a placeholder but at the end you see args[0]. This is because args is a string array, and we want the first element (remember computers start counting at zero) so we declare it there.
Type in your executable with something after it, such as
helloworld test
and you should see some output like:
You passed test as an argument
It’s that easy. You can pass multiple arguments to the executable and they will be numbered args[0], args[1] and so forth.
Conclusion
This was a tutorial to get your feet wet and write a little code. There’s lots more to go, but I hope this has at least covered some basics and given you a rough idea of how to build a console application in C#. There’s tons more and I’ll be digging deeper in the next tutorial.
My aim for this tutorial and the ones following are to get people started programming, and hopefully build a foundation quickly so you can get coding. Since most of my audience is comprised of web developers we will be venturing into ASP.Net stuff but building this core knowledge will definitely help you be a better developer in the future.
My best advice is always to learn the basics. One thing I’ve seen over the years is developers who learn just enough to get the task done they wanted and they start building on that. It’s a fine way to do it but if you don’t get a foundation of the basics built you’ll struggle the whole way. If you learn the deep basics and then start solving problems, you’ll be far better off.
I hope this has helped, Let me know what you think, I’ll repsond.
Can you beat my SkillIQ Score in C#??

I think you can! Take the C# test here to see where you stand!


