


Easy CRUD for your Web API with Dapper

Feb 13, 2016 - 12 min read
Last Update: Jun 7, 2024
Full disclosure here: I don’t like ORMs. If you’re building an enormous enterprise project, you should absolutely use an ORM. If you have data you really care about and a complex, monstrous system using something like Entity Framework can save you a lot of frustration. If you’re building a simple application, or some home project it’s really unnecessary.
Recently I found an ORM that I really like: Dapper. It’s small, simple, and fast. It can be useful on even the smallest of projects. Dapper is a simple object mapper for .Net that extends the IDbConnection interface. It contains helpers that execute queries and map results in a very elegant way. The best part is the performance is close enough to plain old SQL that it’s well worth it. It will reduce the amount of code you write as well, by a long shot.
Dapper Quick Start - Console Application
Just to show you how easy it is to use, let’s do a quick exercise.
Open up Visual Studio, and create a new Console Application
File -> New Project -> Templates -> Visual C# -> Windows -> Console Application

Now, let’s create a MS-SQL database to connect to. Create a database, and make a note of the dbname, user and password for this.
Let’s create a quick table on the database using this code:
USE [ (Your database name) ]
GO

/****** Object:  Table [Customer]  ******/
SET ANSI_NULLS ON
GO

SET QUOTED_IDENTIFIER ON
GO

SET ANSI_PADDING ON
GO

CREATE TABLE [Customer](
	[CustomerID] [int] IDENTITY(1,1) NOT NULL,
	[CustomerFirstName] [varchar](50) NULL,
	[CustomerLastName] [varchar](50) NULL,
	[IsActive] [bit] NOT NULL,
 CONSTRAINT [PK_Customer] PRIMARY KEY CLUSTERED
(
	[CustomerID] ASC
)WITH (PAD_INDEX = OFF, STATISTICS_NORECOMPUTE = OFF, IGNORE_DUP_KEY = OFF, ALLOW_ROW_LOCKS = ON, ALLOW_PAGE_LOCKS = ON) ON [PRIMARY]
) ON [PRIMARY]

GO

SET ANSI_PADDING OFF
GO
Now let’s add a few records to it:
We will grab these later.
Back in Visual Studio, open up your App.config file:
and add an SQL connection string:
<connectionStrings>
	<add name="DefaultConnection" providerName="System.Data.SqlClient"
    	connectionString="Server=server.com;Database=DapperDemo;User Id=userid; Password=mypassword;" />
</connectionStrings>
Obviously you would want to replace this with your information. Save the file.
Next, create a class called “Customer” that looks like this:
class Customer
{
	public int CustomerID { get; set; }
	public string CustomerFirstName { get; set; }
	public string CustomerLastName { get; set; }
	public bool IsActive { get; set; }
}
Save this file into your project’s namespace.
Install Dapper from your Package Manager Console:
Install-Package Dapper
Now open up Program.cs and add the following:
IDbConnection db = new SqlConnection(ConfigurationManager.ConnectionStrings["DefaultConnection"].ConnectionString);
This sets up a connection to your database using the IDbConnection interface.
Add an SQL string:
string SqlString = "SELECT TOP 100 [CustomerID],[CustomerFirstName],[CustomerLastName],[IsActive] FROM [Customer]";
Next, we’re going to use Dapper to bring our records into an object:
var ourCustomers = (List<Customer>)db.Query<Customer>(SqlString);
What this does is pulls the values from the SQL query into a list of Customer objects. Now, some code to iterate through the results:
foreach (var Customer in ourCustomers)
{
	Console.WriteLine(new string('*', 20));
	Console.WriteLine("\nCustomer ID: " + Customer.CustomerID.ToString());
	Console.WriteLine("First Name: " + Customer.CustomerFirstName);
	Console.WriteLine("Last Name: " + Customer.CustomerLastName);
	Console.WriteLine("Is Active? " + Customer.IsActive + "\n");
	Console.WriteLine(new string('*', 20));
}

Console.ReadLine();
Now, run the application and you’ll see this:

Yes, it’s really that easy! You now have a console application reading from a database with very minimal code! Pretty Amazing stuff, but let’s take it further.
Set up a Web API using Dapper
Ok, here’s where we can really let Dapper flex it’s muscles. We’ll set up an ASP.Net Web Api. First we need to set up a repository
Disclaimer: This is not the best design, and I certainly wouldn’t use this for a production application, but it does serve as a good demonstration of how to use Dapper.
Setting up Repository
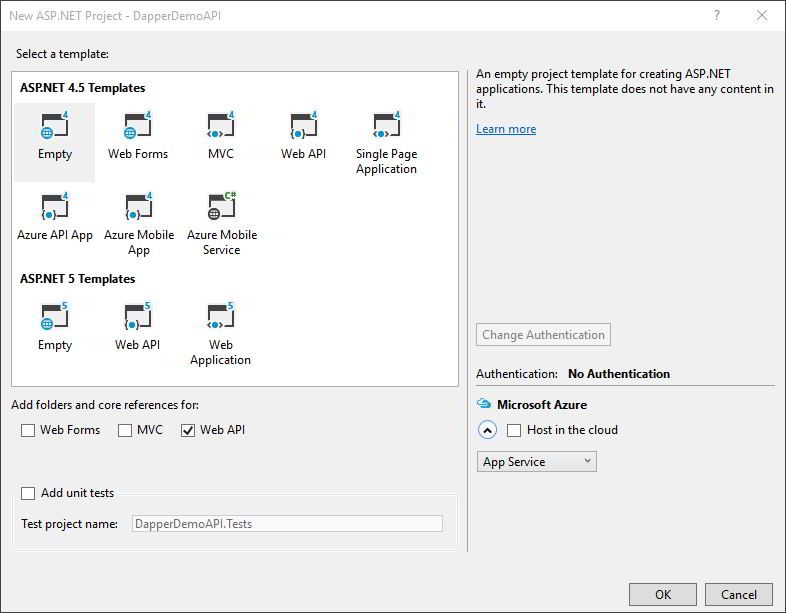
Create a new project in Visual Studio:

We want to create a new ASP.Net Web API project. Select “Empty” then check the “Web API” box like so:
Next, right click on the “Models” folder and select “Add -> New Item”. We want to add a plain class (Visual C# -> Code -> Class) like we did in the last exercize. Name it “Customer.cs” and save it.
Our class is going to look the same as it did before:
public class Customer
{
	public int CustomerID { get; set; }
	public string CustomerFirstName { get; set; }
	public string CustomerLastName { get; set; }
	public bool IsActive { get; set; }
}
This will be our model for this application.
Next, create a folder named “DAL” (Data Access Layer) and let’s create a repository. Add an interface (add -> New Item -> Visual C# -> Code -> Interface) and call it “ICustomerRepository”.
In here we’ll add the methods for our interface:
internal interface ICustomerRespository
{
	List<Customer> GetCustomers(int amount, string sort);
	Customer GetSingleCustomer(int customerId);
	bool InsertCustomer(Customer ourCustomer);
	bool DeleteCustomer(int customerId);
	bool UpdateCustomer(Customer ourCustomer);
}
These will cover our CRUD (Create, Read, Update, Delete) operations, plus a list operation.
Now we’ll create a CustomerRepository class that implements this interface: (add -> New Item -> Visual C# -> Code -> Class) and call it CustomerRespository.cs.
This class should implement the interface and it’s members, to start out let’s make it look like this:
private IDbConnection _db = new SqlConnection(ConfigurationManager.ConnectionStrings["DefaultConnection"].ConnectionString);

public class CustomerRespository : ICustomerRespository
	{
		public List<Customer> GetCustomers(int amount, string sort)
		{
			throw new NotImplementedException();
		}

		public Customer GetSingleCustomer(int customerId)
		{
			throw new NotImplementedException();
		}

		public bool InsertCustomer(Customer ourCustomer)
		{
			throw new NotImplementedException();
		}

		public bool DeleteCustomer(int customerId)
		{
			throw new NotImplementedException();
		}

		public bool UpdateCustomer(Customer ourCustomer)
		{
			throw new NotImplementedException();
		}
	}
We will now fill out these methods for our repository, following the CRUD pattern.
CREATE Customer entries with InsertCustomer
In this method we’ll insert a new customer:
public bool InsertCustomer(Customer ourCustomer)
{
	int rowsAffected = this._db.Execute(@"INSERT Customer([CustomerFirstName],[CustomerLastName],[IsActive]) values (@CustomerFirstName, @CustomerLastName, @IsActive)",new { CustomerFirstName = ourCustomer.CustomerFirstName, CustomerLastName = ourCustomer.CustomerLastName, IsActive = true});

	if (rowsAffected > 0)
	{
		return true;
	}
	return false;
}
If you look closely, we are using a parameterized query here. Then you pass in an object containing those parameters, taken from the object we passed in. This is pretty straightforward.
READ Customer entries with GetSingleCustomer
With this method we’ll retrieve a single customer by CustomerID:
public Customer GetSingleCustomer(int customerId)
{
`return _db.Query<Customer>("SELECT[CustomerID],[CustomerFirstName],[CustomerLastName],[IsActive] FROM [Customer] WHERE CustomerID =@CustomerID", new { CustomerID = customerId }).SingleOrDefault();
}
Simple stuff. Since this is an iDisposable, a using statement should be used here. But for demo purposes this works.
UPDATE Customer entries with UpdateCustomer
To update a customer we’ll need to pass in a Customer object, and we’ll update the record based on what’s in that object.
public bool UpdateCustomer(Customer ourCustomer)
{
	int rowsAffected = this._db.Execute("UPDATE [Customer] SET [CustomerFirstName] = @CustomerFirstName ,[CustomerLastName] = @CustomerLastName, [IsActive] = @IsActive WHERE CustomerID = " + ourCustomer.CustomerID, ourCustomer);

	if (rowsAffected > 0)
	{
		return true;
	}
	return false;
}
In this statement we send an update with parameterized queries and map the ourCustomer object to the record to be updated. We’ll change the values in this object in our controller previous to this action.
DELETE Item with DeleteCustomer Method
In this method we’ll send a simple parameterized delete command based on the integer we pass in:
public bool DeleteCustomer(int customerId)
{
	int rowsAffected = this._db.Execute(@"DELETE FROM [jeremy].[Customer] WHERE CustomerID = @CustomerID",new{ CustomerID = customerId });

	if (rowsAffected > 0)
	{
		return true;
	}
return false;
}
Like similar methods we pass a true/false based on the number of records affected, if it’s not zero we’ll assume it was successful.
LIST Items with GetCustomers Method
In this method we are going to get a list of items. You can select how many items, and how you want to sort them.
public List<Customer> GetCustomers(int amount, string sort)
{
	return this._db.Query<Customer>("SELECT TOP "+ amount + " [CustomerID],[CustomerFirstName],[CustomerLastName],[IsActive] FROM [Customer] ORDER BY CustomerID " + sort).ToList();
}
Disclaimer (again): If you insist on using this code for a real project, please add exception handling at the very least.
Dapper’s Query method takes the query results, maps it to the Customer object and adds it to a list. In this one line of code. Good stuff.
Now we have our simple repository set up, so now we need to create a controller and wire things up.
One last thing, like we did with our console application, you will need to open up Web.Config and add your connection string:
<connectionStrings>
	<add name="DefaultConnection" providerName="System.Data.SqlClient"
    	connectionString="Server=server.com;Database=DapperDemo;User Id=userid; Password=mypassword;" />
</connectionStrings>
We will be using this for our Web API connection.
Create a Web API Controller
Now we’re going to create a Web API to connect to our data. One thing I would definitely suggest is downloading POSTman. This is a Chrome extension that makes testing and developing REST APIs a breeze.
For the first step, add the repository to your class, by adding the following to it:
private CustomerRespository _ourCustomerRespository = new CustomerRespository();
This will be the instance of our repository to work with. We will need a controller to interact with this repository.
Let’s call this “CustomerController”.
You’ll see a set of methods listed in the code that will interact with our repository.
- IEnumerable
Get() = LIST - string Get(int id) = READ
- void Post([FromBody]string value) = CREATE
- void Put(int id, [FromBody]string value) = UPDATE
- void Delete(int id) = DELETE
With this controller we can perform all the methods we need to start working with our customers.
Create Method
Let’s start with creating a record. The first thing we’ll want to do is create a “response” to let us know whether the object was created or not. For this exercise we’ll just use a true/false value.
Let’s now refactor our method to make it behave how we’d like.
To do this, we’ll want to start with the Post method on line 25. I’m a huge fan of attribute routing in Web API, so let’s decorate this method a bit. Add the following before the method on the controller:
[Route("Customers")]
[HttpPost]
And then let’s refactor the method signature:
public bool Post([FromBody]Customer ourCustomer)
This way it will return a boolean result based on whether the record was inserted or not.
Inside the method, let’s just return the InsertCustomer call:
return _ourCustomerRespository.InsertCustomer(ourCustomer);
This will be our method of inserting (sans any form of sanitization or exception handling).
In Postman, create a POST request to your URL that looks like this:
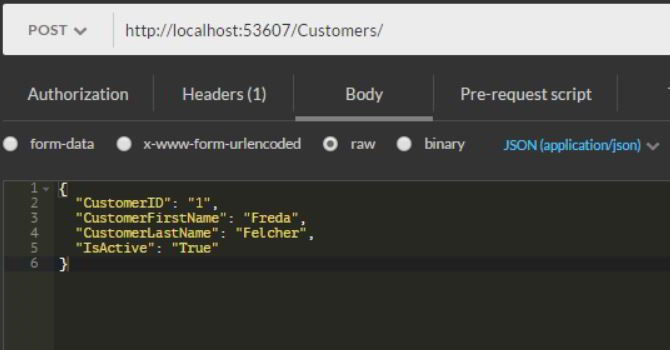
Here we are sending a JSON object in a POST that matches our model.
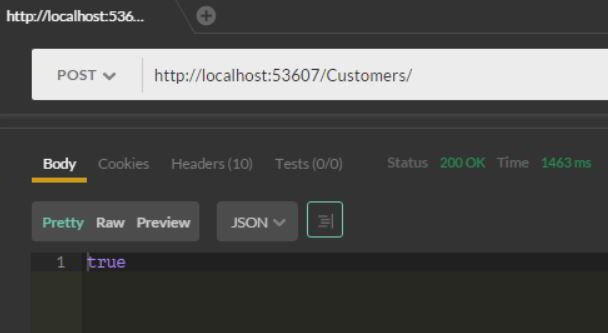
If successful it should look like this:
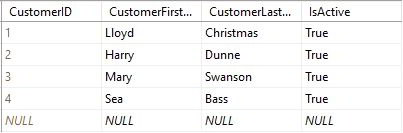
And when you open up SSMS and select all records you should see this:
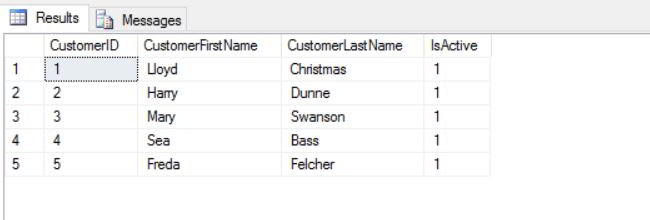
You’ve just inserted a new record! Here’s what the final method looks like:
[Route("Customers")]
[HttpPost]
public bool Post([FromBody]Customer ourCustomer)
{
	return _ourCustomerRespository.InsertCustomer(ourCustomer);
}
This is about as bare bones as you can get with ASP.Net.
Read Method
Now that we’ve created some records we are going to want to read a record. For this we’ll use the get method that takes an id as a parameter. Let’s add the routes for that:
[Route("Customers/{id}")]
[HttpGet]
This tells our controller to route any GET request with a parameter to this method, and our parameter name is “id”.
Next we’ll call our repository using that id:
return _ourCustomerRespository.GetSingleCustomer(id);
Now, send a GET request with postman, and append a CustomerId to the URL, and you should see this:
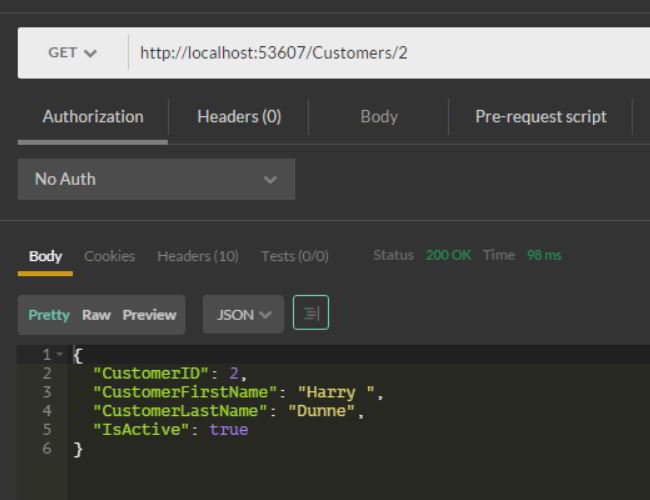
This is a pretty easy way to grab a single record. Now let’s update that record.
Update Method
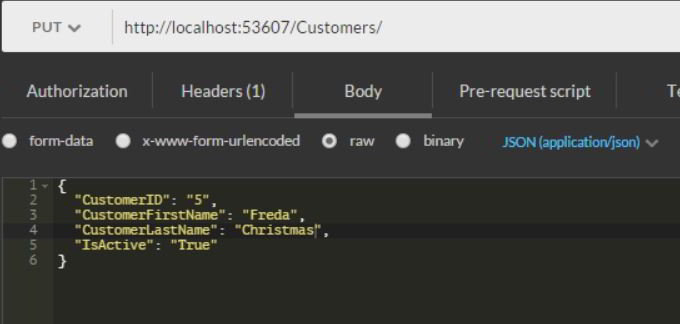
In this method we are going to update an id. We’ll do this by sending a JSON object representing the customer record. Whatever is contained in that record is what we’ll want to update it to, so if Freda and Lloyd get married, we want to send this:
{
  "CustomerID": "5",
  "CustomerFirstName": "Freda",
  "CustomerLastName": "Christmas",
  "IsActive": "True"
}
to our PUT method. Since the last name is now different our repository will update the record with all the information in this object, and change the last name. We are making a PUT request to /Customers and sending the new object.
We start with the decorators to add to the method:
[Route("Customers")]
[HttpPut]
Then we’ll need to change the signature:
public bool Put([FromBody]Customer ourCustomer)
This makes it so the method takes in the new object and updates the record accordingly. If it’s successful it will return true. Add the following to the method body:
return _ourCustomerRespository.UpdateCustomer(ourCustomer);
Now prepare your command in POSTman, it should look like this:
And send it. If successful it should return true, and your record should be updated:
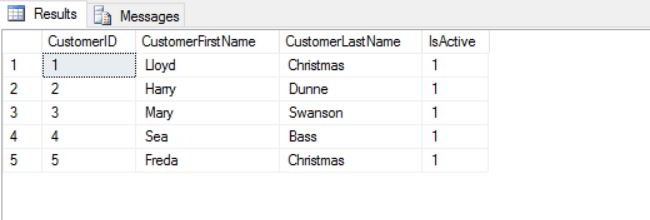
Congratulations LLoyd and Freda!
The final method in your controller should look like this:
[Route("Customers")]
[HttpPut]
public bool Put([FromBody]Customer ourCustomer)
{
	return _ourCustomerRespository.UpdateCustomer(ourCustomer);
}
Delete Method
In this method we’re going to delete a record by it’s ID. This will be done by sending a DELETE command to a url with an id as a parameter. The decorators look like this:
[Route("Customers/{id}")]
[HttpDelete]
and we’ll change the return type on the method to a boolean:
public bool Delete(int id)
and add the call to our repository in our method:
return _ourCustomerRespository.DeleteCustomer(id);
And we’re ready to go. Let’s create the command in POSTman:
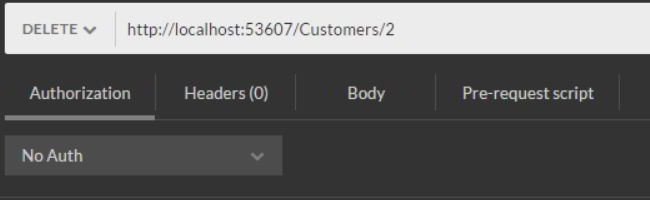
Send the DELETE to the url of /Customers/2. Sorry Harry, but you gotta go.
Afterwards it should look like this:
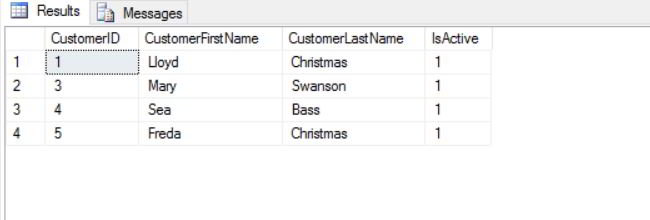
You’ve now deleted a record!
List Method
Ok for the last one, we want to make a list of every customer in the database. Or maybe a few customers. Remember we put some parameters into the GetCustomers method so we could select an amount of customers and sort them by ID. So for the default Get method let’s just grab 10 customers (if available) and sort them ascending:
[Route("Customers")]
[HttpGet]
public List<Customer> Get()
{
	return _ourCustomerRespository.GetCustomers(10, "ASC");
}
In POSTMan, send a get to the url of /Customers. It should look like this:
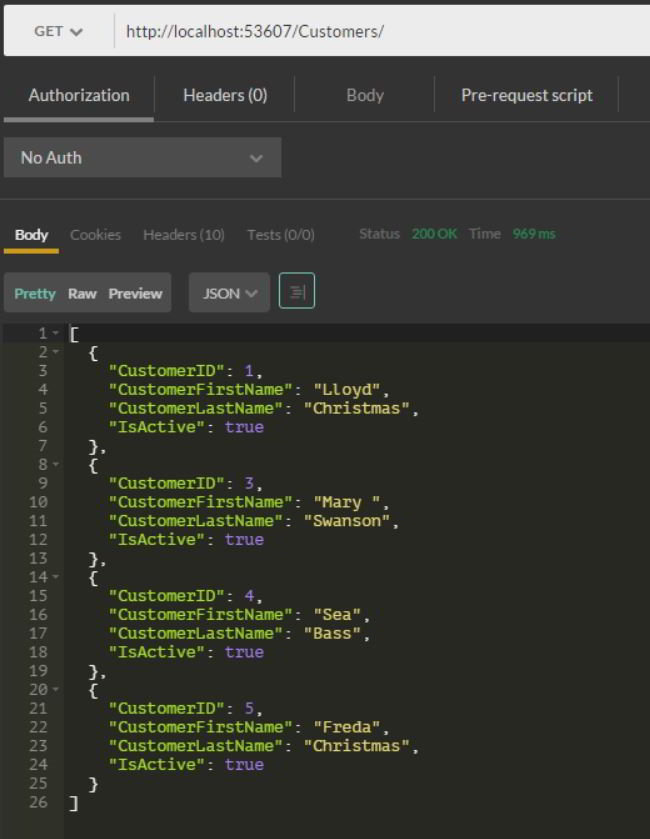
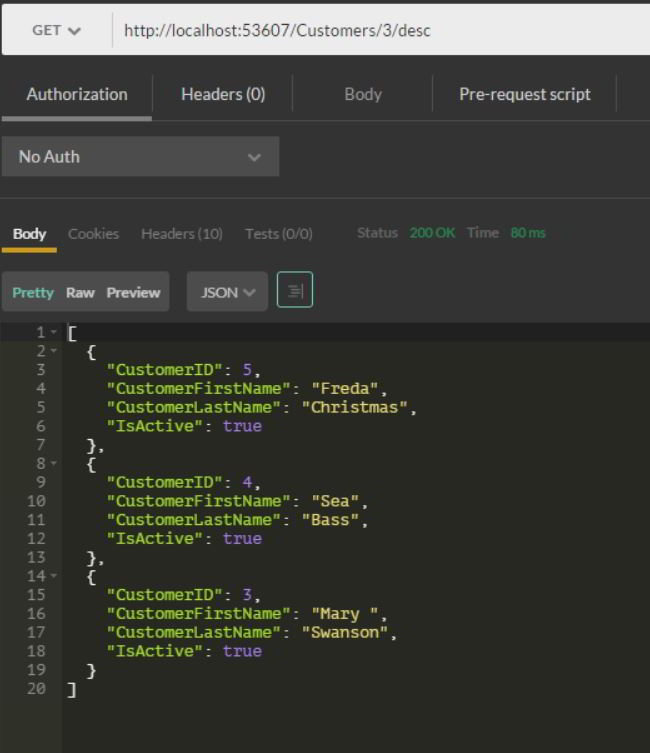
Pretty easy right? But lets make it so we can choose the number and sort of the output also. Create another method that looks like this:
[Route("Customers/{amount}/{sort}")]
[HttpGet]
public List<Customer> Get(int amount, string sort)
{
	return _ourCustomerRespository.GetCustomers(amount, sort);
}
Now we’re overloading the Get method and sending additional parameters. As we’ve seen before, we set up a decorator to take the amount and sort from the URL. These are passed into the method and then passed to the repository. If you send a GET to /Customers/3/desc it should look like this:
Pretty powerful stuff! That concludes the API Methods, of course you can add many more and build complex queries and methods that go beyond this.
Get the POSTMan collection here
Summary
Though this was a fairly long tutorial, you can see how much time and code you can save using Dapper. It’s only slightly different performance wise from doing raw SQL Connections. There’s a good performance comparison here.
For a long time I would choose to write out SQL by hand for the extra performance and power, especially with small projects. Entity Framework always seemed like overkill for most stuff. But after discovering Dapper it’s far easier and faster than writing it out, without the extra overhead of EF. It’s a solid win.
I hope this has helped you explore Dapper and inspire you to make something with it. You’ll find it’s pretty great. If you have any questions or have something to say leave it in the comments or bug me on Twitter.
-Jeremy
Follow @JeremyCMorgan

Skip the hype. The newsletter that keeps you in the know.
AI news curated for engineers. The AI New Hotness Newsletter is what you need.
Zero fluff. Just the research, tools, and infra updates that actually affect your production stack.
Stay up to date on AI for developers - Subscribe on LinkedIn
