


Set up easy file sharing with Samba

Last Update: Mar 25, 2023

AI changed software development. This is how the pros use it.
Written for working developers, Coding with AI goes beyond hype to show how AI fits into real production workflows. Learn how to integrate AI into Python projects, avoid hallucinations, refactor safely, generate tests and docs, and reclaim hours of development time—using techniques tested in real-world projects.
In this tutorial, I’ll show you how easy it is to setup file sharing on your network using SAMBA. You can easily share files between Linux and Windows machines with a pretty minimal amount of setup.
How I’m Using SAMBA File Sharing
First, to give you little context, here’s how I am using Samba file sharing, with something I recently set up for course development.
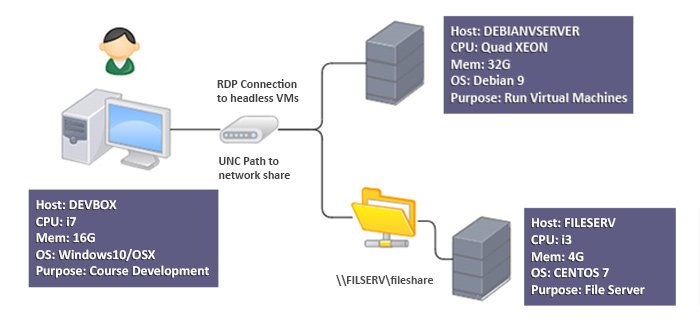
So I am developing courses and using a variety of Operating Systems for it. One course in progress is Windows related and I’m using Windows 2012 and 2016 Server machines. For another course I’m working on I’m using a variety of Linux machines. I’m spinning up multiple virtual machines with a fresh OS to demonstrate configuration and modification, then destroying them.
Workstation
I have my workstation that I record with (my trusted Mac Mini), and I use Windows or OSX and run things like Camtasia, Final Cut Pro, Audio Tools, Photoshop, PowerPoint etc. I have a dual monitor setup and I use RDP to connect to a server, and use a full screen on one Monitor and have my recording tools on the other.
Virtualization
I’m using a server to run headless virtual machines that I described in this article. The sole purpose of this machine is to run these virtual machines and I want to dedicate as many resources as I can to it, because it runs several at one time.
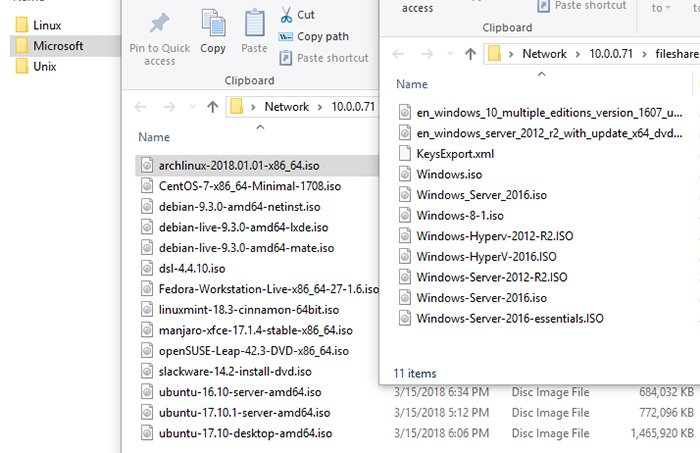
I ran into an issue where i had a huge folder full of ISO images for each operating System. Combined with the disk space used by the virtual machines themselves, I decided I had to split it off.
File Server
I found an old machine I wasn’t using and decided to drop a hard drive in it, and turn it into a file server. With an i3 and 4 gigs of RAM it’s plenty fast. I decided to go with a minimal install of CENTOS an install SAMBA on it.
Workflow
So now I can ssh into my server and run commands to spin up the various virtual machines I need to run, and I have space to create many more. I have the installation ISOS residing on the file share server, which is mounted on the VM server. So to create a new virtual machine, I can just mount an ISO, run the installer and go, and create fresh new machines as needed.
If I see some cool distribution of Linux I just have to try, I can download the installer ISO with my workstation to the shared folder, then build a vm to install from the ISO.
It’s not redundant or secured tightly, but it’s all stuff I can download from MSDN or the internet to replace anyway. This is one of my uses for a Samba server.
Now, let’s get to the tutorial.
##How to Set Up File Sharing with Samba
Here’s how you can set up a file server with Samba. For this I am using CentOS Linux, but it’s very similar for most Linux distributions.
I’ve created an account named jeremy that will be used for serving files. You never want to run this kind of stuff under the root account. So I’ll log in with the Jeremy account, and use sudo to run any commands that require administrative rights.
In a fresh install of CentOS you will need to add this account to the sudoers file.
Install Samba
First we’ll need to install Samba.
sudo yum install samba samba-client samba-common
Now we want to create a new folder for our file share. This is where the files will be stored that we’re sharing.
Then we’ll change the permissions on this share
mkdir -p /srv/samba/secure
sudo chmod -R 0770 /srv/samba/secure
sudo chown -R root:smbgrp /srv/samba/secure
sudo chcon -t samba_share_t /srv/samba/secure
Add Samba User Group
Next we’ll add the Samba user group. Then you’ll want to add a user to that group. You want to make sure this is an existing user on your machine, for this I used the Jeremy account I created the folder with.
groupadd smbgrp
usermod jeremy -aG smbgrp
Next, you want to add the Samba user, which should be the same as the account you’re using (in my case, jeremy).
sudo smbpasswd -a jeremy
it will ask you for your password. This will be the password for the Samba share, and you can put in your existing user password here.
Edit Smb.conf
Next we want to edit our smb.conf. Make a quick backup of the file
sudo cp /etc/samba/smb.conf /etc/samba/smb.bak
Now, let’s edit the file
sudo vi /etc/samba/smb.conf
First I’m going to change the name of my workgroup to WORKGROUP in all caps. this is the name of my windows workgroup.
Here we have homes which are home folders for each user if you’d like to use those
Let’s create a share that points to where we just created a folder.
[fileshare]
    comment= my file share
    path = /srv/samba/secure
    valid users = jeremy
    public = no
    writable = yes
    browsable = yes
    printable = no
    create mask = 0765
Start Service
You want to test your configuration changes to make sure everything is correct.
testparm
Then, it’s time to restart the smb and nmb services:
sudo systemctl restart smb.service
sudo systemctl restart nmb.service
Firewall
We’ll have to add an entry to the firewall to allow the samba service to be accessible from outside the network:
firewall-cmd --permanent --zone=public --add-service=samba
firewall-cmd --reload
Browsing
Now, we can browse to the server from a Windows machine:
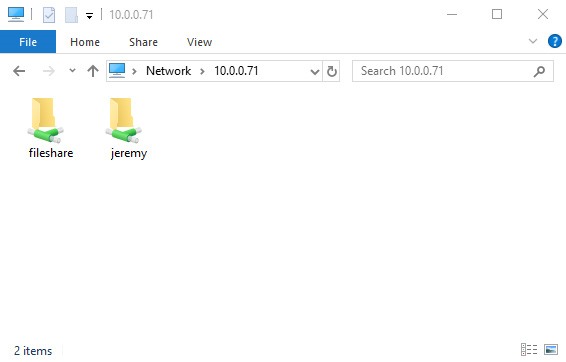
You can even mount it as a mapped drive, or [mount it on a linux machine](https://wiki.samba.org/index.php/Mounting_samba_shares_from_a_unix_client). Samba setup is super easy, and great to use.
Conclusion
Setting up Samba is easy, and something to consider if you want easy file sharing between Linux and Windows machines, or even Linux and Linux machines. I gave some context of how to set it up, but there are tons of use cases for Samba. You can also tie it in to different authentication/authorization schemes if you’d like an use it with Active Directory as well. Check out Samba.org for more information.

Want to learn more about Linux? Of course you do. Check out this Linux Fundamentals course. You can sign up for a free trial here and take it today!

Skip the hype. The newsletter that keeps you in the know.
AI news curated for engineers. The AI New Hotness Newsletter is what you need.
Zero fluff. Just the research, tools, and infra updates that actually affect your production stack.
Stay up to date on AI for developers - Subscribe on LinkedIn
