


How To Monitor Room Temperature with a Raspberry Pi

Jeremy Morgan 
Jul 26, 2015 - 7 min read
Last Update: Dec 31, 2022

AI changed software development. This is how the pros use it.
Written for working developers, Coding with AI goes beyond hype to show how AI fits into real production workflows. Learn how to integrate AI into Python projects, avoid hallucinations, refactor safely, generate tests and docs, and reclaim hours of development time—using techniques tested in real-world projects.
Today I’m going to show you how to monitor ambient room temperature with a Raspberry Pi. We’re going to wire up a temperature sensor, gather temperature values and send them to Firebase. This could be the start of a weather station or other crazy experiments. In my case we’re going to check the temperature of a room to make sure our newborn puppies don’t get too hot or cold during the day.
What you’ll need:
- Raspberry Pi (I am using a Raspberry Pi 2, but you don’t have to)
- Breadboard
- Temperature Sensor
- A Firebase account (optional)
Notice: I have updated the source code for this article and built an ASP.Net Web API for this project. Watch them on GitHub to get notified when it’s updated.
Hooking up the Hardware
I ordered the DS18B20 Waterproof Digital temperature sensor + extras from Adafruit (Get it here) which is an excellent value at $10.
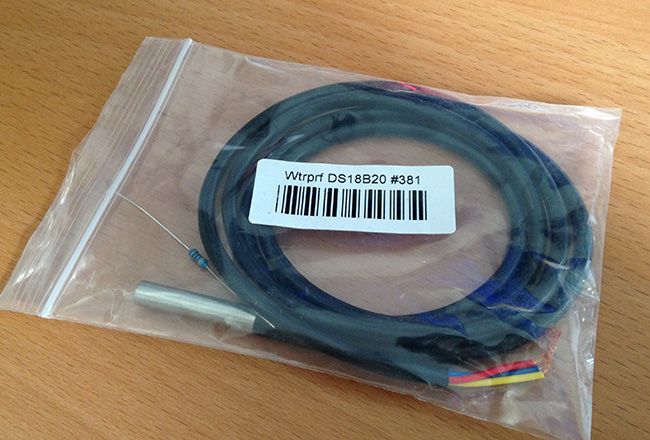
Out of the box the wires are stripped, but since I’m putting this in a bread board, I decided to solder them. I quickly learned my last roll of solder is rather poor quality, but it will work:
I then wired it up to the breadboard. There are plenty of diagrams online for wiring this up, I hooked
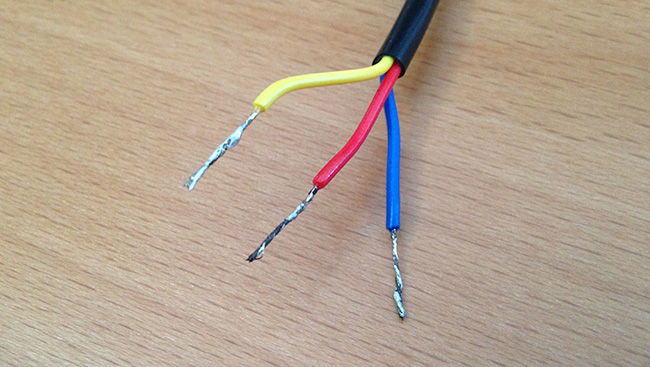
- Red: +3v
- Yellow: GPIO 4
- Blue: Ground
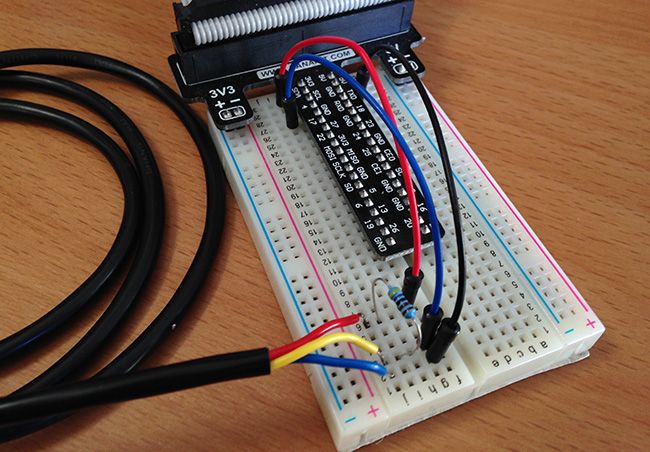
The kit comes with a 4.7k resistor which you place between the red and yellow. The breadboard I use is from the Canakit for Raspberry Pi. This is connected to a Raspberry Pi 2, although a Raspberry Pi B would work just the same.
Testing the Sensor
The support for the DS18B20 on the Pi makes this part really trivial. First you need to edit /boot/config.txt:
sudo nano /boot/config.txt
and add the following line:
dtoverlay=w1-gpio
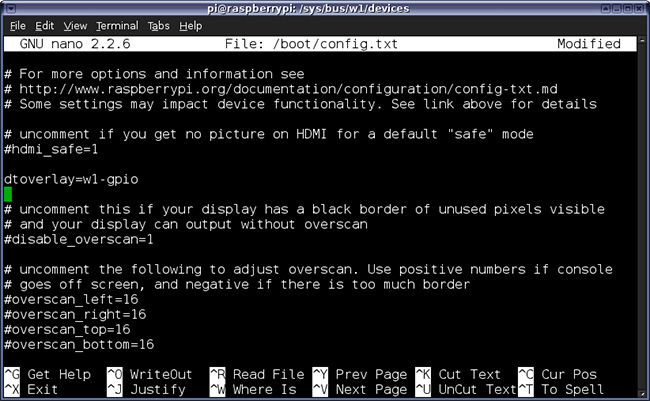
Then save and reboot the Pi.
To test the functionality, load in the kernel modules:
sudo modprobe w1-gpio
sudo modprobe w1-therm
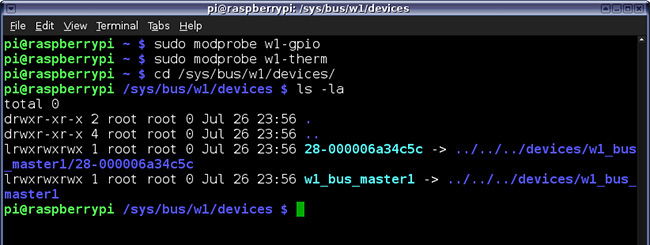
Run the following to find your device:
cd /sys/bus/w1/devices
ls -la
This will show you the directory your device is in, based on your serial number. It should start with 28x:
cd into that directory, then type:
cat w1_slave
and it should look like this:
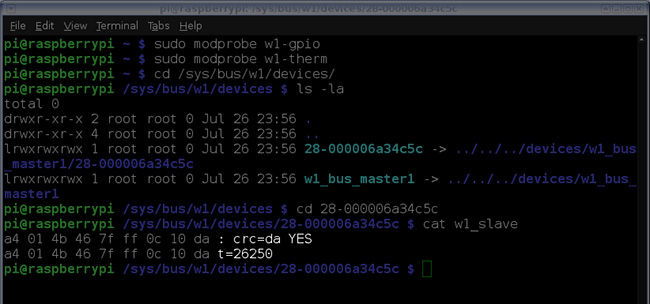
Look for crc=da YES. The YES means it’s working, and the t=n is the celcius*1000. This verifies the sensor is functioning.
Writing the Temp Gathering Script.
For this step, you will be creating a Python script to read the sensor. You can use Nano on the Pi, or use an IDE on your desktop and copy the file up to the Pi. I used PyCharm in Linux to write the script then copied it up to my Pi with each iteration with the following command:
scp readtemp.py pi@192.168.1.12:/home/pi
This can be a little more fluid when developing.
The initial file we’ll create is some code lifted from the Adafruit tutorials:
import os
import glob
import time
os.system('modprobe w1-gpio')
os.system('modprobe w1-therm')
base_dir = '/sys/bus/w1/devices/'
device_folder = glob.glob(base_dir + '28*')[0]
device_file = device_folder + '/w1_slave'

def read_temp_raw():
    f = open(device_file, 'r')
    lines = f.readlines()
    f.close()
    return lines

def read_temp():
    lines = read_temp_raw()
    while lines[0].strip()[-3:] != 'YES':
        time.sleep(0.2)
        lines = read_temp_raw()
    equals_pos = lines[1].find('t=')
    if equals_pos != -1:
        temp_string = lines[1][equals_pos+2:]
        temp_c = float(temp_string) / 1000.0
        temp_f = temp_c * 9.0 / 5.0 + 32.0
        return temp_c, temp_f

while True:
    print(read_temp())
    time.sleep(1)
This is a super simple script that loads in the kernel modules and reads the device. The function read_temp() opens the device and reads it by parsing through the lines and spitting out Celsius and Fahrenheit values. Then at the bottom we have a loop to do this every second.
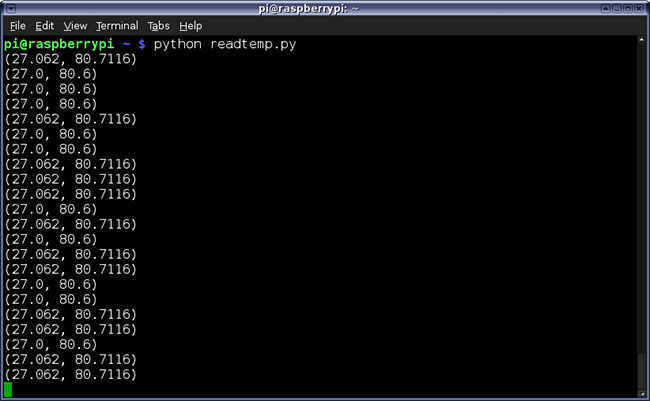
python readtemp.py
Your output should look like this:
This is great, but we can’t do much with it. At this point you could just write these values to a file and parse them out later. But we’re going to store these values in a datastore.
In readtemp.py, let’s make some changes.
Remove the loop:
while True:
    print(read_temp())
    time.sleep(1)
and replace it with this:
print str(calendar.timegm(time.gmtime())) + ',' + str(read_temp())
Then add the following lines to the top:
import calendar
import time
Run the file again and you should see this:

We’re getting closer! Here is what the final script should look like:
import os
import glob
import subprocess
import calendar
import time
import urllib2
import json

#initialize
os.system('modprobe w1-gpio')
os.system('modprobe w1-therm')

#device
base_dir = '/sys/bus/w1/devices/'
device_folder = glob.glob(base_dir + '28*')[0]
device_file = device_folder + '/w1_slave'

# Opens raw device, code changed to reflect issue in Raspian
def read_temp_raw():
    catdata = subprocess.Popen(['cat',device_file], stdout=subprocess.PIPE, stderr=subprocess.PIPE)
    out,err = catdata.communicate()
    out_decode = out.decode('utf-8')
    lines = out_decode.split('\n')
    return lines

# Reads temperature, outputs farenhiet
def read_temp():
    lines = read_temp_raw()
    while lines[0].strip()[-3:] != 'YES':
        time.sleep(0.2)
        lines = read_temp_raw()
    equals_pos = lines[1].find('t=')
    if equals_pos != -1:
        temp_string = lines[1][equals_pos+2:]
        temp_c = float(temp_string) / 1000.0
        temp_f = temp_c * 9.0 / 5.0 + 32.0
        return temp_f

## Please add some authentication or a secret here!

url = 'https://yourfirebaseapp.firebaseio.com/readings.json'

postdata = {
    'date': str(calendar.timegm(time.gmtime())),
    'temp': str(read_temp())
}

req = urllib2.Request(url)
req.add_header('Content-Type','application/json')
data = json.dumps(postdata)

response = urllib2.urlopen(req,data)
Pushing the results to Firebase
This is an optional step, but here we are going to push the results up to Firebase. You can create an account for free, and I would encourage you to check it out. The URL will be the url of the project you create and the name of a JSON file to use for storage. For example:
You can replace with Firebase with any API call at this point, and it’s easy to make a POST in Python:
Add the following includes:
import urllib2
import json
Then add the following to the bottom:
url = 'https://mycooltemperatureapp.firebaseio.com/readings.json'
postdata = {
    'date': str(calendar.timegm(time.gmtime())),
    'temp': str(read_temp())
}

req = urllib2.Request(url)
req.add_header('Content-Type','application/json')
data = json.dumps(postdata)

#you don't have to do anything with response
response = urllib2.urlopen(req,data)
Now run the file a few times, and open up your Firebase console, and you should see something that looks like this:
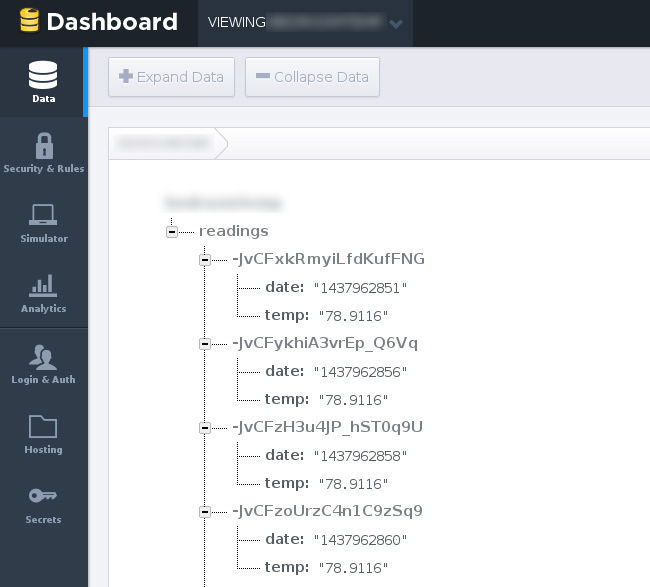
Congrats! you’re now storing data. You can export this to a CSV or create a JavaScript application to display it. I’ll be covering what we do with this data in a future tutorial.
NOTE: You really should add some authentication to your Firebase database if you care about the data.
Create a CRON Job to Automatically gather data
There’s two ways we can run this script automatically. We can add the loop back in, and just run the Python script and keep it running. You can use something like nohup to run it as a service but that’s a little shaky. I’d rather just run the script once a minute with a CRON job. To do this, type in
crontab -e
to run the cron editor. Add an entry like this:
* * * * * /usr/bin/python /home/pi/readtemp.py
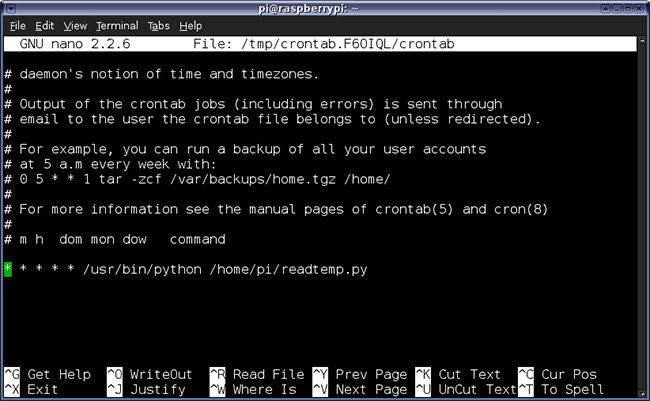
And save the file. CRON will automatically update and start running this command every minute (or whatever you set it to).
This will ensure that your script is run at regular intervals. You can set it to run every minute, hourly, daily or whatever you’d like. Here’s some more information about scheduling cron jobs..
Summary
I hope this tutorial has helped show you how to monitor ambient air temperature with a Raspberry Pi. If you purchase this same sensor it’s waterproof which means there is much more you can do with it. You can also hook up multiple sensors to the Pi, separated by serial numbers.
There are tons of neat things you can do with this information, and I encourage you to experiment. In a future tutorial we’ll take some of this data I’ve gathered and do something with it. Thanks for reading.
You can download the source code for this article at GitHub.
Want to learn more about the Raspberry Pi? Check out the Raspberry Pi for Developers course!

Skip the hype. The newsletter that keeps you in the know.
AI news curated for engineers. The AI New Hotness Newsletter is what you need.
Zero fluff. Just the research, tools, and infra updates that actually affect your production stack.
Stay up to date on AI for developers - Subscribe on LinkedIn