


How to Overclock your Raspberry Pi

Jeremy Morgan 
Dec 17, 2012 - 5 min read
Last Update: Jun 7, 2024

AI changed software development. This is how the pros use it.
Written for working developers, Coding with AI goes beyond hype to show how AI fits into real production workflows. Learn how to integrate AI into Python projects, avoid hallucinations, refactor safely, generate tests and docs, and reclaim hours of development time—using techniques tested in real-world projects.
Do you want to safely overclock your Raspberry Pi? Here’s how you need to do it. There are a few articles out there on overclocking your Raspberry Pi, and I followed them but it didn’t work. So after some Googling and Stack Overflow work I find the answer, and I’m here to save you some time.
Find your current clock speed
There are several ways to find out what you Pi is running at currently. Most likely it’s running at 700mhz, and this is how you verify it
cat /proc/cpuinfo
After running this you should see the following output:
Processor : ARMv6-compatible processor rev 7 (v6l)
BogoMIPS : 697.95
Features : swp half thumb fastmult vfp edsp java tls
CPU implementer : 0x41
CPU architecture: 7
CPU variant : 0x0
CPU part : 0xb76
CPU revision : 7
Hardware : BCM2708
Revision : 000f
Serial : 0000000035dfc68c
Note the “BogoMIPS” is at 697.95. You can also run this:
cat /sys/devices/system/cpu/cpu0/cpufreq/scaling_cur_freq
Which displays your frequency in Hz, which should be 700000.
The best way to see what your Pi is really running is by using the following:
vcgencmd get_config arm_freq
It should say something like
arm_freq=700
*Note: it may say arm_freq=0 I have seen this happen too. Don’t fret about it.
This is the base frequency of 700 MHz, which is the default. But we want it to go faster than that right?
How to Overclock the Raspberry Pi
You can use software to overclock your Raspberry Pi and still be covered by the warranty. I gave some innaccurate information about this and was corrected in the comments:
Please note though that dynamic overvolting as you describe here doesn’t void your warranty; it’s only if you set “force_turbo=1” that we set the “warranty void” bit. - Eben Upton
The first thing you’ll want to do is modify your config.txt:
sudo nano /boot/config.txt
The config.txt is read by the GPU before the ARM core is initialized. It can be used to set various system configuration parameters such as overclocking.
In this file, you’ll want to add the following two lines:
arm_freq=800 sdram_freq=500
Note: These are the settings I found that get the most speed and stability. Your mileage may vary, feel free to play around with it. There are folks running at 1ghz just fine, but my unit didn’t function well at this level.
Now according to most instructions you can change this and just reboot. But it won’t always work. It didn’t for me. I found some advice on Stack Overflow and had to do the following:
sudo sync
sudo sh -c "echo 3 > /proc/sys/vm/drop_caches"
sudo cp config.txt config.txt.save
sudo cp config.txt config.txt.save.1
sudo sync; sync; exit; exit
This will log you out of your terminal, or terminal window, so log back in and type:
sudo sync; sync;
sudo shutdown -h now
Now, your Raspberry Pi will be shut down. Unplug it, and plug it back in.
Check your changes
To see what frequency you’re running at, issue the following command:
vcgencmd get_config arm_freq
It should say:
arm_freq=800
Congratulations, you’ve overclocked your Pi. For building large packages or just surfing the desktop you’ll notice a big difference.
If that doesn’t work
You can also overclock using the raspi-config utility. To get this, you’ll have to update your firmware, issue the following command:
sudo apt-get update && sudo apt-get install raspberrypi* raspi-config
Now with the updated firmware, start the raspi-config utility:
sudo raspi-config
You will see the following menu:
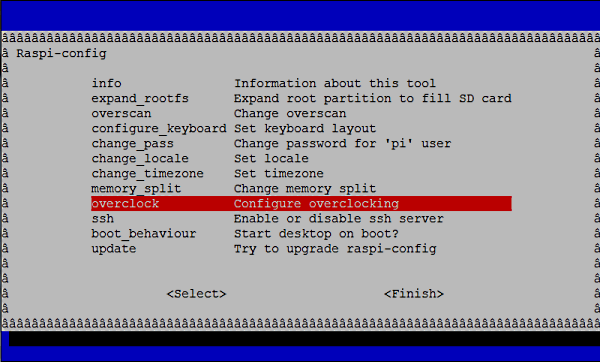
And you’ll be shown the following options:
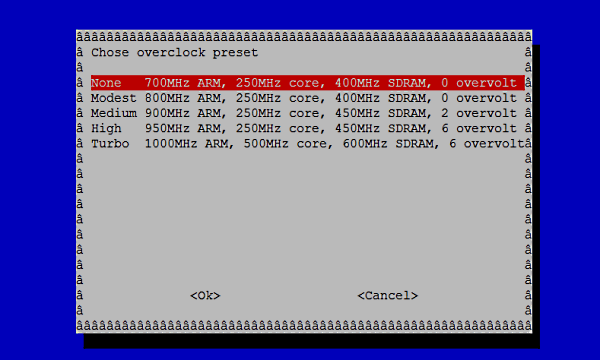
I set mine to “Modest” at 800/250. As it says this is a modest overclocking and seems the safest.
After selecting your option, it will ask to reboot, say yes.
Again to check it, you can type in
vcgencmd get_config arm_freq
and it should say:
arm_freq=800
You can also check more options by typing:
vcgencmd get_config int
And it should look like this:
arm_freq=800
core_freq=250
sdram_freq=500
disable_overscan=1
boot_delay=1
temp_limit=85
Enjoy! As I said there are many different options and your results may vary. There are people running very fast speeds and not having stability or heat problems, I don’t know enough about the Pi to know exactly why that is. It could be a combination of environment and the tasks being performed.
Even more options
So do you want to play around with it some more? Of course, if you have the Raspberry Pi you’re likely a hacker anyway. Here is another update you can do to make the memory dynamic between the GPU and CPU.
sudo rpi-update 5fcbae1010c1ba99a77bab5198508bb9e6964d03
And add the following to your cmdline.txt
coherent_pool=2M cma=2M smsc95xx.turbo_mode=N
And add the following to config.txt
gpu_mem_256=160
gpu_mem_512=316
cma_lwm=16
cma_hwm=32
Reboot your Raspberry Pi. Now, you’ll always have a set number allocated to the ARM, it will have 96M of memory and the GPU will always have at least 20M. But, when the GPU gets low, it will request some memory from ARM, and vice versa. The cma_lwm is the “low water mark” meaning if it has less that memory available it will request it from ARM. If the GPU has more than cma_hwm (high water mark) it will release memory to the ARM.
Summary
I hope this has helped you wade through some of the problems with overclocking the Raspberry Pi. It’s not always as straightforward as some of the tutorials suggest, but it isn’t terribly difficult. Here are some additional Raspberry Pi overlocking options if you want to play around even more.
For the most part you’ll probably want to run some pretty modest settings, but if you’re building something from source or doing a lot of video you’ll want to squeeze every bit of performance you can out of it.
Let me know what kind of configs you come up with and what works best for you!
Questions, comments? Let me know!
Want to learn more about the Raspberry Pi? Check out the Raspberry Pi for Developers course!

Skip the hype. The newsletter that keeps you in the know.
AI news curated for engineers. The AI New Hotness Newsletter is what you need.
Zero fluff. Just the research, tools, and infra updates that actually affect your production stack.
Stay up to date on AI for developers - Subscribe on LinkedIn
