


Raspberry Pi how to: Set up a SVN Server

Jeremy Morgan 
Feb 11, 2013 - 5 min read
Last Update: Jun 7, 2024

AI changed software development. This is how the pros use it.
Written for working developers, Coding with AI goes beyond hype to show how AI fits into real production workflows. Learn how to integrate AI into Python projects, avoid hallucinations, refactor safely, generate tests and docs, and reclaim hours of development time—using techniques tested in real-world projects.
Today we’re going to go thru the process of turning your Raspberry Pi into an SVN server. While this may not be the most practical use of your Pi, it’s an excellent learning experience. SVN is a pretty good way to manage your code, especially if you’re juggling lots of projects.
This isn’t going to be a “how to use SVN” tutorial but more of a guide for setting it up on a Raspberry Pi. If you’re not familiar with SVN Here is an excellent free guide to get started.
Getting Started
The first thing we want to do is ssh into the Raspberry Pi or open up a terminal. We’re going to do all of this from the Linux prompt.
Then, we’ll install Subversion:
sudo apt-get install subversion
Now let’s create a folder to put our repositories in:
mkdir -p /home/pi/repos
Now, we need to create a project:
svnadmin create /home/pi/repos/helloworld
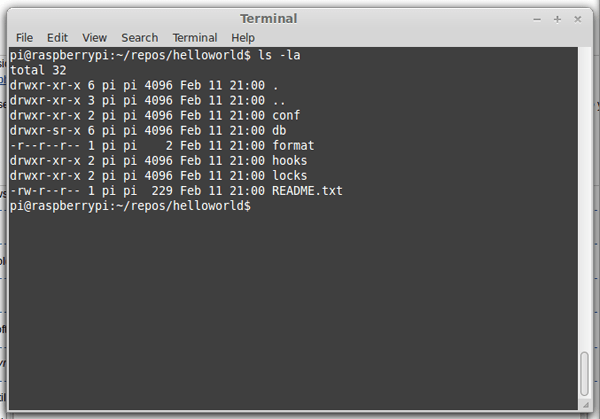
With that created, you should see a folder that looks like this:
Let’s create a project that we’ll add to SVN.
mkdir /home/pi/projects/helloworld
cd /home/pi/projects/helloworld
create a file called main.cpp:
sudo nano main.cpp
add the following to the file:
// main.cpp v .1
#include <iostream>
using namespace std;

int main ()
{
  cout << "Hello World!";
  return 0;
}
And save it.
Now we’ll want to import it into svn:
sudo svn import /home/pi/projects/helloworld/ file://localhost/home/pi/repos/helloworld/
You should see a screen that looks like this.
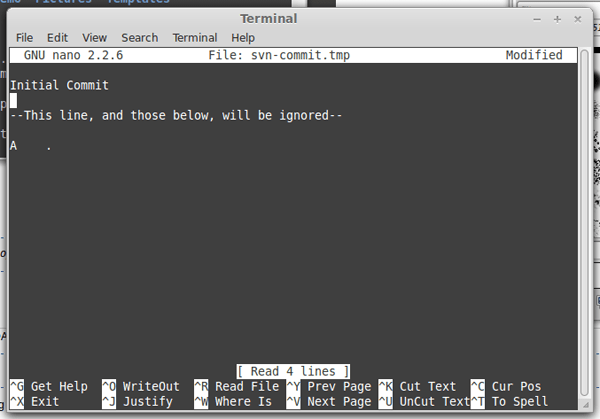
Enter a message for committing this file. CTRL+X exits this screen.
You should see:
Adding /home/pi/projects/helloworld/main.cpp

Committed revision 1.
Set up Remote Access
Now, we’ll need to set up the server part of it so you can access it remotely:
sudo apt-get install apache2 libapache2-svn
(If you already have Apache installed you won’t need to reinstall it)
Now let’s edit the dav_svn.conf:
sudo nano /etc/apache2/mods-available/dav_svn.conf
Add this to the bottom of the file:
<Location /svn>
  DAV svn
  SVNParentPath /home/pi/repos
  AuthType Basic
  AuthName "Subversion Repo"
  AuthUserFile /etc/apache2/dav_svn.passwd
  <LimitExcept GET PROPFIND OPTIONS REPORT>
    Require valid-user
  </LimitExcept>
 </Location>
Quit and save the file, then restart apache:
sudo /etc/init.d/apache2 restart
Now we need to change the permissions of this folder:
sudo chown -R www-data:www-data /home/pi/repos
We’re changing this so the SVN server can access these files. Don’t modify these files by hand anymore! Always use SVN.
Now you need to create an SVN user:
sudo htpasswd -c /etc/apache2/dav_svn.passwd jeremy
Remember only use -c the first time you add a user. If you run this with -c again it will delete existing users! This is for the first time only!
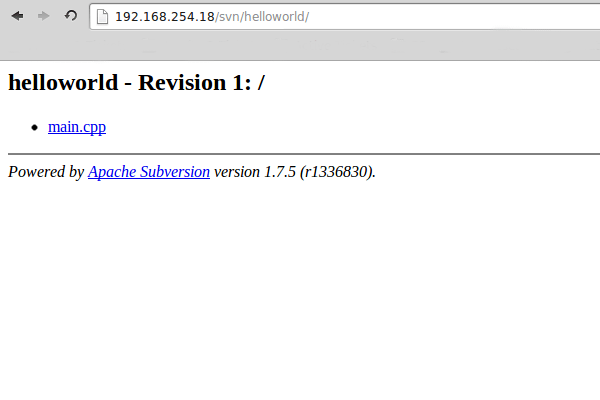
Now you can check your repo thru a web browser on your machine using the IP of your Raspberry Pi (probably different than mine)
http://192.168.254.18/svn/helloworld/
You should see a screen like this:
Go back to your main computer and check out the repo.
Check out the repository in Linux
Open up a terminal window, and type the following:
svn co --username jeremy http://192.168.254.18/svn/helloworld
You should see:
A helloworld/main.cpp
Checked out revision 1.
Now go into that folder and edit the file again:
cd helloworld
nano main.cpp
And make the following changes:
// main.cpp v .2
#include <iostream>
using namespace std;

int main ()
{
    cout << "Hello World! Version 2";
    return 0;
}
Quit and save the file.
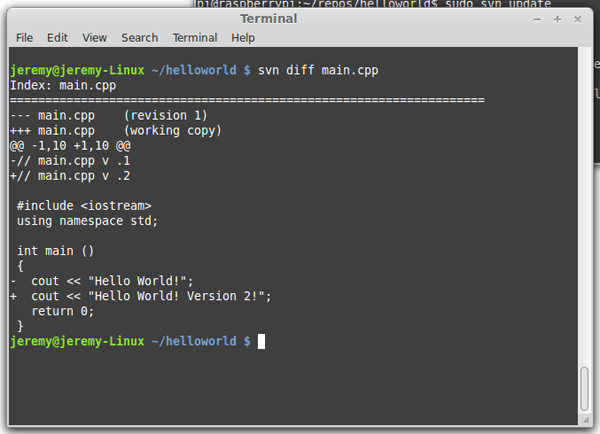
Now do a diff on the file:
svn diff main.cpp
A diff shows you the difference between the file you’re editing, and what’s stored in SVN.
You will see a screen that looks like this:
Now, let’s commit that file with the message “version 2”
sudo svn commit -m "version 2" main.cpp
You should see:
Sending main.cpp
Transmitting file data .
Committed revision 2.
Now, if you check your repo browser again:

You will see that your change has been committed. It’s that easy!
Check out the repository in Windows
Let’s say you’re a Windows user (not that there’s anything wrong with that) and you want to connect to your Pi from Windows. I recommend using Tortoise SVN for the task. It’s a great free program that works well.
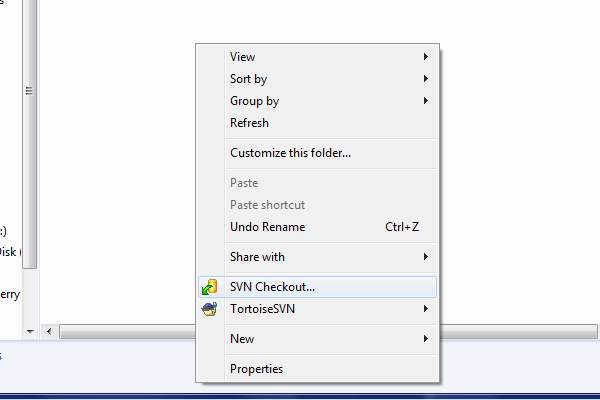
Once it’s installed, create a folder on your Desktop called “repos”. Then, right click inside that box and select “SVN Checkout”.
In that window, put in the URL to your repository:
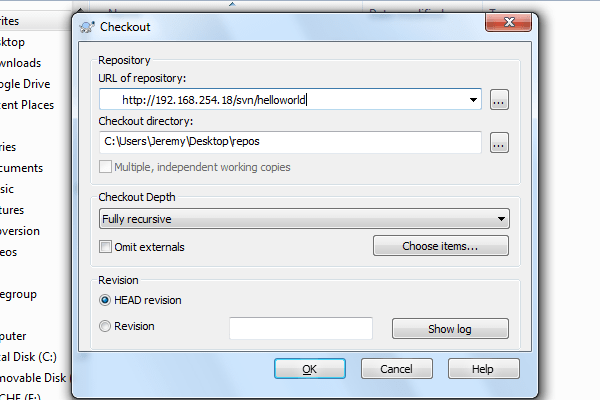
For me it is http://192.168.254.18/svn/helloworld but yours may be different.
Click OK, and you should see the main.cpp file in there.
Edit it and make the following changes:
// main.cpp v .2
#include <iostream>
using namespace std;

int main ()
{
    cout << "Hello World! Version 2";
    return 0;
}
Save the file. Then right click on the file and select “SVN Commit”.
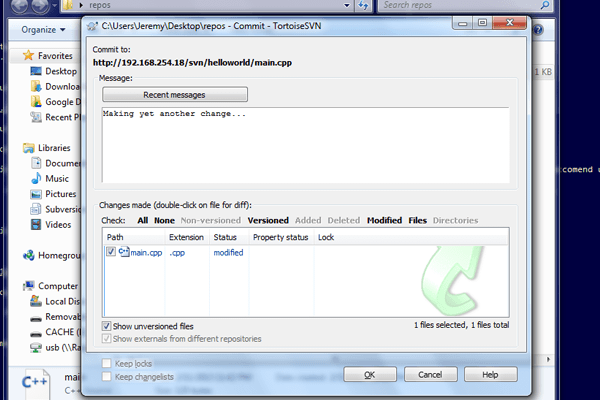
Enter a message and commit the file. It will ask for your login, then you You will see the following screen:
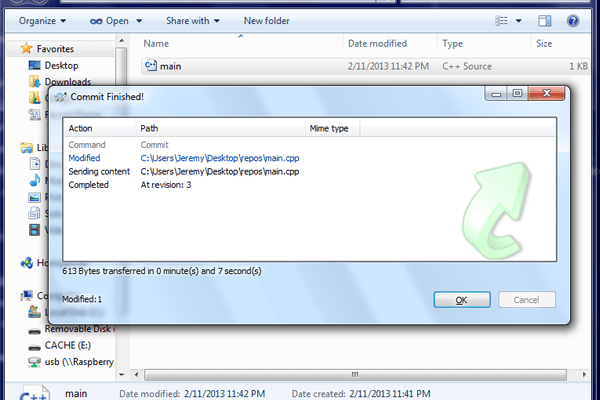
And you’re done!
Conclusion
I hope this has helped you with setting up an SVN server on your Raspberry Pi. It’s not incredibly practical but it seems to work well for me, as I’m the only developer using it. I also store my repos on an external drive, as the SD cards seem to flake out quite a bit.
If you have any questions, Let me know!
Want to learn more about the Raspberry Pi? Check out the Raspberry Pi for Developers course!

Skip the hype. The newsletter that keeps you in the know.
AI news curated for engineers. The AI New Hotness Newsletter is what you need.
Zero fluff. Just the research, tools, and infra updates that actually affect your production stack.
Stay up to date on AI for developers - Subscribe on LinkedIn