


Building a Web App with Flask and Python: A Beginner's Guide

Apr 2, 2023 - 9 min read
Last Update: Apr 2, 2023
So you wanna build a Flask App and don’t know where to start? Researching different frameworks to see what’s best? Welcome to this tutorial on building a web app using Python and Flask! Whether you’re a beginner or an experienced developer, you’ll have a solid foundation for building your own web apps using Python and Flask.
If you’d like the full source code for this tutorial, it’s available here: Flask Sample Web App
What is Flask?
Flask is a Python web framework that makes building web apps easy. It’s a popular choice among developers because it’s simple, flexible, and fun to work with. Web applications can be created with Flask without the complexity or bloat of other frameworks.
Why Use Flask and Python?
Using Flask and Python to build web applications has several advantages:
- Python is an easy to learn, versatile programming language. (One of my favorites)
- Flask is lightweight and easy to set up, so you can get your project up and running quickly.
- The Python and Flask ecosystems offer tons of libraries and extensions, which makes it easy to add functionality to your app.
Now, let’s get started with creating a simple Flask web app.
What Are We Building?
In this tutorial, we’ll create a simple web app that shows a list of drones for comparison when considering a purchase. And, of course since this is one of my tutorials, we’ll use SQLite as our backend database to store the drone information.
Setting up Your Environment
You must have Python 3.6 or newer to complete this tutorial.
To create a virtual environment, open your terminal or command prompt, navigate to your project folder, and run
python -m venv bestdrones
This command will create a new folder named bestdrones in your project directory, containing an isolated Python environment. To activate the virtual environment, run
source bestdrones/bin/activate
on macOS/Linux or
bestdrones\Scripts\activate
in Windows. With the virtual environment activated, install the required packages for this tutorial by running
pip install flask
And you’ll be ready to go! You don’t need a fast computer for this tutorial.
Setting Up the Database
First, let’s create a database file and define our Drone table SQL code. Create a new file called loader.py and add the following code:
import sqlite3

def create_database():
    connection = sqlite3.connect('drones.db')
    cursor = connection.cursor()

    cursor.execute("""
    CREATE TABLE IF NOT EXISTS "Drone" (
        "Id"    INTEGER,
        "Name"  TEXT,
        "FlightTime"    INTEGER,
        "SensorSize"    TEXT,
        "WeightMetric"  NUMERIC,
        "WeightImperial"        NUMERIC,
        "TopSpeedMetric"        NUMERIC,
        "TopSpeedImperial"      NUMERIC,
        "Cost"  NUMERIC,
        PRIMARY KEY("Id" AUTOINCREMENT)
    );
    """)

    connection.commit()
    connection.close()

if __name__ == "__main__":
    create_database()
This script creates a new SQLite database file called drones.db and defines the Drone table. The if __name__ == "__main__": line checks if the script is being run as the main program, and if so, it calls the create_database() function.
Run the script with
python database.py
and you should see a new drones.db file created in your project directory. You can also open it with something like DB Browser:
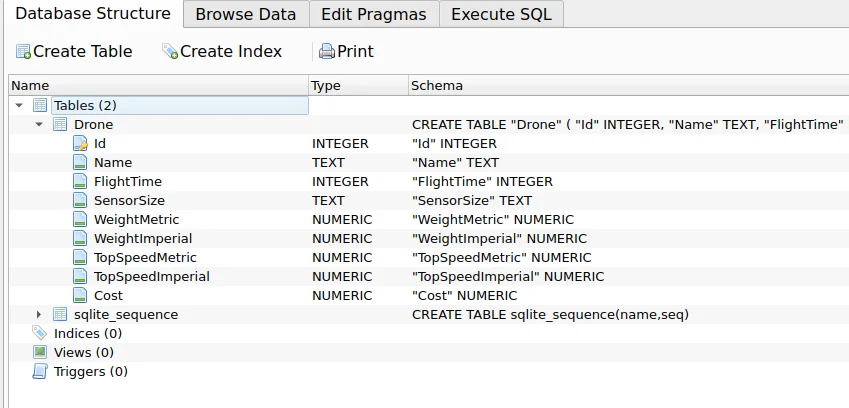
Now we have a database set up.
Building the Flask App
Now that we’ve set up our database, let’s build our Flask web app. Create a new file called app.py and add the following code:
from flask import Flask, render_template
import sqlite3

app = Flask(__name__)

def get_drones():
    connection = sqlite3.connect('drones.db')
    cursor = connection.cursor()

    cursor.execute("SELECT * FROM Drone")
    drones = cursor.fetchall()

    connection.close()
    return drones

@app.route('/')
def index():
    drones = get_drones()
    return render_template('index.html', drones=drones)

if __name__ == '__main__':
    app.run(debug=True)
Here’s a quick breakdown of the code:
- We import the necessary modules and create a Flask app instance.
- The get_drones() function connects to the drones.db SQLite database, selects all records from the Drone table, fetches the results, and closes the connection.
- The
index()function is decorated with the@app.route('/')decorator, which means it will be executed when users visit the root URL of our app. This function callsget_drones()to retrieve the drone data and then renders an HTML template calledindex.html, passing the drone data to it. - Finally, we run the Flask app with
app.run(debug=True)if the script is being run as the main program.
The app is up and running, and ready for requests. However, if you load it into the browser now, it won’t work:
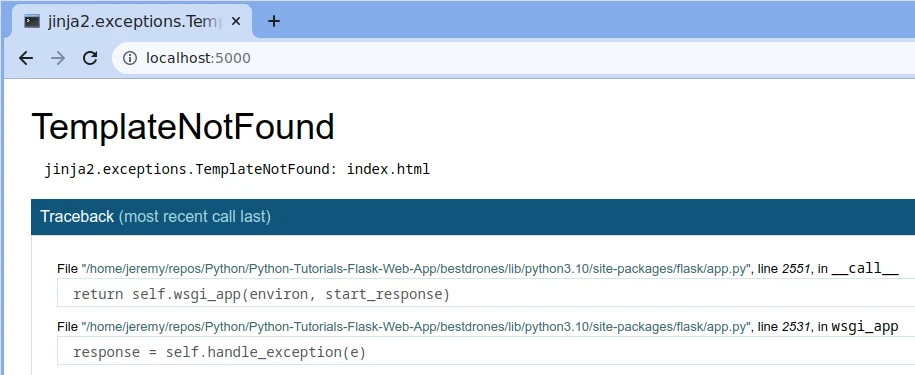
We need to create a template. So let’s do that.
Creating the HTML Template
Now, let’s create the index.html template that displays our drone data. In your project directory, create a new folder named templates and a new file inside it named index.html.
Open it and add the following:
<!DOCTYPE html>
<html lang="en">

<head>
    <meta charset="UTF-8">
    <meta name="viewport" content="width=device-width, initial-scale=1.0">
    <title>Drone Comparison</title>
    <link rel="stylesheet" href="https://maxcdn.bootstrapcdn.com/bootstrap/4.5.2/css/bootstrap.min.css">

</head>

<body>
    <div class="container">
        <h1 class="text-center my-4">Top Best Selling Drone Comparison</h1>
This contains standard HTML header stuff like the document type and header includes. Then we start the body, and the container that our data (an HTML table) will be displayed in.
Here is our table:
<table class="table table-striped">
    <thead>
        <tr>

            <th>Name</th>
            <th>Flight Time (minutes)</th>
            <th>Sensor Size</th>
            <th>Weight (kg/lbs)</th>
            <th>Top Speed (km/h/mph)</th>
            <th>Cost (USD)</th>
        </tr>
    </thead>
    <tbody>
This section creates a table with a striped style. The table has six columns:
- Name
- Flight Time
- Sensor Size
- Weight
- Top Speed
- Cost
The <thead> tag creates the table header row with the column titles, and the <tbody> tag begins the table body where the drone data will be displayed.
{% for drone in drones %}
<tr>
    <td>{{ drone[1] }}</td>
    <td>{{ drone[2] }}</td>
    <td>{{ drone[3] }}</td>
    <td>{{ drone[4] }} / {{ drone[5] }}</td>
    <td>{{ drone[6] }} / {{ drone[7] }}</td>
    <td>{{ drone[8] }}</td>
</tr>
{% endfor %}
This section uses a Jinja2 template tag to loop through each drone in the list of drones and display its data in a table row. Each drone’s data is displayed in a separate column. Weight and Top Speed data is displayed in two columns separated by a forward slash.
</tbody>
</table>
</div>
</body>
</html>
This closes it all up for us. This HTML template uses Bootstrap to apply some basic styling (again, it’s one of my tutorials, what do you expect). It should look good enough.
Let’s see what it looks like.
Running the App
Now that we have our Flask app, database, and template set up, it’s time to run the app. In your terminal or command prompt, navigate to your project directory and run:
python app.py
You should see output similar to this:
 * Running on http://127.0.0.1:5000/ (Press CTRL+C to quit)
 * Restarting with stat
 * Debugger is active!
 * Debugger PIN: 123-456-789
Open your web browser and visit http://127.0.0.1:5000/. You should see the Drone Comparison app displaying an empty table.

Awesome, that looks much better. But we need some data!
Adding Drones to the Database
To see some drone data in our app, let’s add a few sample drone entries to the drones.db database. You can use a SQLite GUI tool like DB Browser for SQLite to add records to the Drone table or modify the database.py script to insert sample data programmatically.
Let’s modify database.py, so we have some sample data to start with.
Preparing the CSV File
First, create a CSV file with the following columns: Name, FlightTime, SensorSize, WeightMetric, WeightImperial, TopSpeedMetric, TopSpeedImperial, and Cost. The column names should match the field names in the Drone table, excluding the Id field. Save the file as drones.csv.
Here’s an example of what your CSV file should look like:
Name,FlightTime,SensorSize,WeightMetric,WeightImperial,TopSpeedMetric,TopSpeedImperial,Cost
DJI Mini 2,31,1/2.3",0.249,0.548,57,35.4,449
DJI Air 2S,31,1",0.595,1.31,68.4,42.5,999
DJI Mavic 2 Pro,31,1",0.907,2,72,44.7,1599
DJI Mavic 2 Zoom,31,1/2.3",0.905,1.995,72,44.7,1299
DJI Phantom 4 RTK,30,1",3.94,8.68,72,44.7,6000
Autel EVO Lite+,40,1",0.82,1.807,64.8,40.3,1299
Autel EVO Lite,40,1/2.3",0.82,1.807,64.8,40.3,999
Skydio 2,23,1/2.3",0.775,1.709,58,36,999
PowerVision PowerEgg X Wizard,30,1/2.3",0.86,1.896,60,37.3,1249
Yuneec Typhoon H3,25,1",2.01,4.431,50,31,2599
Note: I used ChatGPT to generate this list, so I have no idea how accurate it is
We’ll use this as our initial data.
Writing the Data Import Script
Now, let’s modify our loader.py to add data from our CSV file.
At the top of the script, add the following:
import csv
This imports a CSV library we can use to read the CSV file.
Scroll down, below create_database() add in this function:
def insert_drone_data(drone_data):
    connection = sqlite3.connect('drones.db')
    cursor = connection.cursor()

    cursor.execute("""
    INSERT INTO Drone (Name, FlightTime, SensorSize, WeightMetric, WeightImperial, TopSpeedMetric, TopSpeedImperial, Cost)
    VALUES (?, ?, ?, ?, ?, ?, ?, ?)
    """, drone_data)

    connection.commit()
    connection.close()
Then we’ll create another function to load the CSV data:
def load_csv_data(file_name):
    with open(file_name, 'r') as csv_file:
        csv_reader = csv.reader(csv_file)
        next(csv_reader)

        for row in csv_reader:
            drone_data = tuple(row)
            insert_drone_data(drone_data)
Then, down in our “main” area, add a call to the method:
load_csv_data('drones.csv')
Here’s a breakdown of the code:
- We define a function
insert_drone_data(drone_data)that takes a tuple of drone data and inserts it into the drones.db database. - We define a
function load_csv_data(file_name)that reads the CSV file using Python’s built-in csv module. We skip the header row withnext(csv_reader)(the column headings) and then loop through the remaining rows. - For each row in the CSV file, we convert it to a tuple and call the
insert_drone_data(drone_data)function to insert the data into the drones.db database. - Finally, we call the
load_csv_data('drones.csv')function to load the data from the drones.csv file.
Running the Data Import Script
To load the data from the drones.csv file into the drones.db database, navigate to your project directory in your terminal or command prompt and run:
python import_data.py
This will execute the import_data.py script and insert the drone data from the CSV file into the drones.db database.
You’ve successfully loaded data into the drone database from a CSV file. This method can be adapted to load data from various sources, such as JSON files, APIs, or even scraping data from websites.
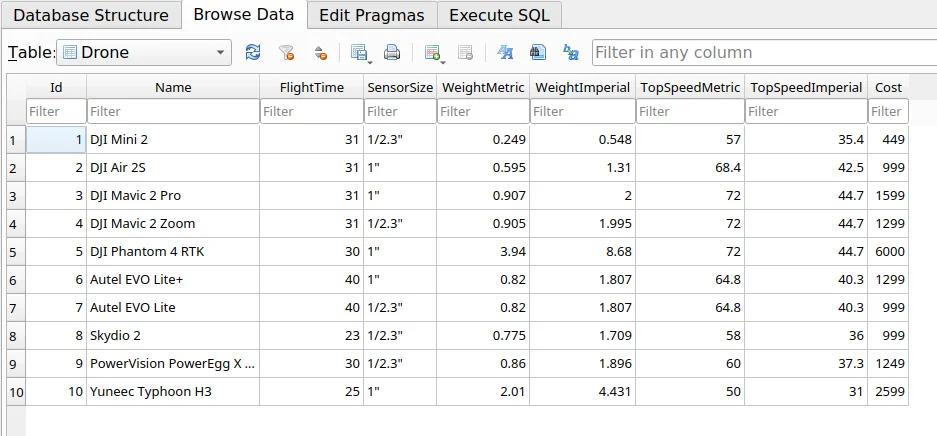
Once you’ve added some drone data to the drones.db database, refresh the web page, and you should see the drone data displayed in the table.
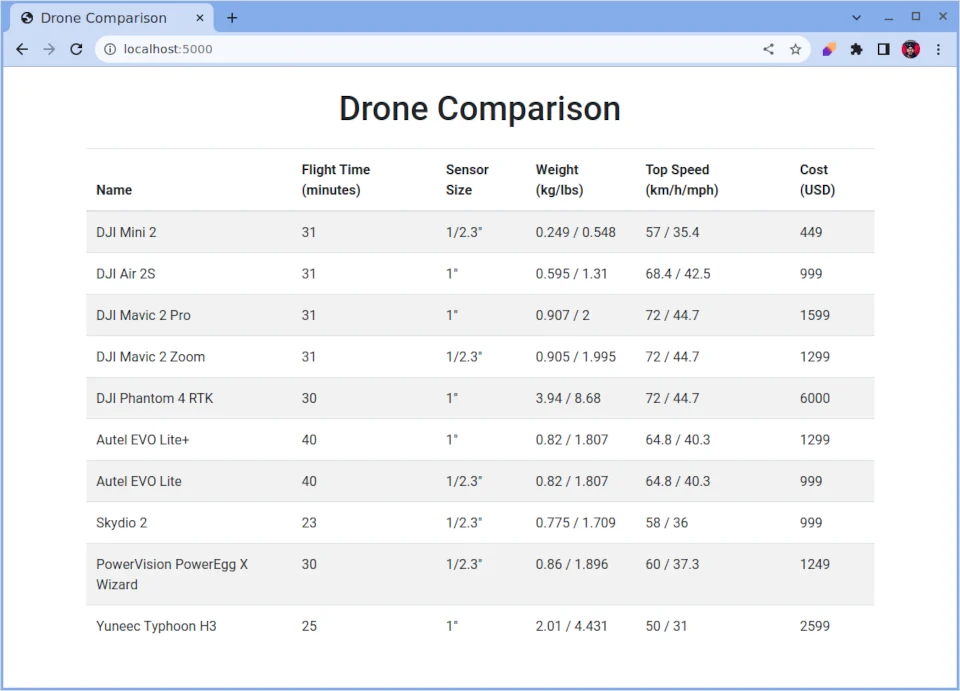
Ah yeah, that’s more like it! Now we have our data displayed from the table to our Flask web app page!
Add Some Styling (Optional)
We can add a little styling to our page so it’s not to boring. Add this into the index.html:
<style>
    body {
        background-color: #004d79;
        /* Sets the background color to blue */
    }

    table {
        background-color: #fff;
        /* Sets the table background color to white */
        border-radius: 15px;
    }

    h1 {
        color: #fff;
    }

    .table-striped tbody tr:nth-of-type(odd) {
        background-color: #c9c9c9;
        /* Sets the background color of odd rows to light gray */
    }
</style>
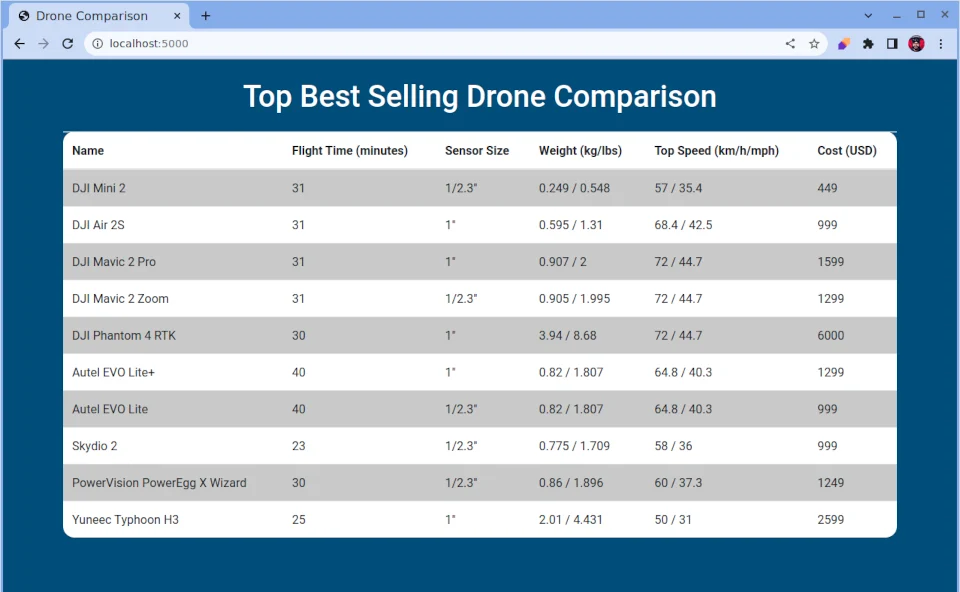
And reload the page. Let’s see what it looks like now:
Not too shabby!
Conclusion
Congratulations! You’ve successfully built a web app with Flask and Python! This app displays a list of drones for comparison from a database. We will explore more features, such as the ability to add, edit, or delete drones directly from the web app very soon. The possibilities are endless! Happy coding!
Follow @JeremyCMorgan

Skip the hype. The newsletter that keeps you in the know.
AI news curated for engineers. The AI New Hotness Newsletter is what you need.
Zero fluff. Just the research, tools, and infra updates that actually affect your production stack.
Stay up to date on AI for developers - Subscribe on LinkedIn