


Get and Store Temperature from a Raspberry Pi with Go

Jeremy Morgan 
Jun 9, 2020 - 10 min read
Last Update: Dec 26, 2022

AI changed software development. This is how the pros use it.
Written for working developers, Coding with AI goes beyond hype to show how AI fits into real production workflows. Learn how to integrate AI into Python projects, avoid hallucinations, refactor safely, generate tests and docs, and reclaim hours of development time—using techniques tested in real-world projects.
In this tutorial, I’ll show you how to grab temperature from a Raspberry Pi and build an endpoint to store the data, with Go. You will learn:
- How to retrieve the temperature from a sensor
- How to send that data in JSON
- Build an API endpoint to receive it
- Store the data in SQLite database
And we’ll do it all with Go. I did a live stream of the entire process that you can watch here.
What You’ll Need for This Tutorial

- A Raspberry Pi (any model should work)
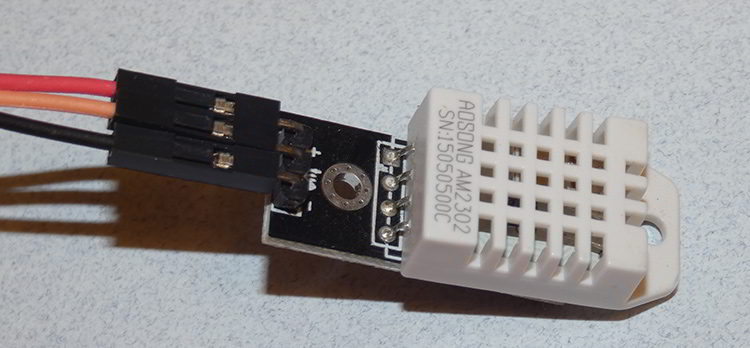
- An AM2302 (Wired DHT22) sensor
- A Linux Host (I’m using an Amazon LightSail FreeBSD Server)
I’m using Pop!_OS to develop on, but you can use anything you’d like.
Note: If you’d like to learn more about Raspberry Pi, check out this new course, setting up a Raspberry Pi Home Server.
Why Are We Doing This?
I’ve previously written a tutorial to grab room temperature from a Raspberry Pi, and it’s very similar, only using Python. This is another “hand-rolled” tutorial. Why are we doing this by hand? Why not use a cloud service?
The purpose of this tutorial is to give you a deep understanding of IoT and how it works. You can easily use a cloud provider such as:
These services are great. They’re awesome. If you’re building a real project or working on IoT professionally, this is the way to go. They provide excellent secure services and handle so many things for you.
That’s great, but if you want to truly learn IoT you need to get down to the nuts and bolts. The cloud services have clients you configure, and you push the data up, and it’s visualized for you. In this tutorial, we’re going to build all that stuff ourselves and understand it.
Let’s Rock and Roll.
Connect the Temperature Sensor

The sensor will have three wires coming out from it and will need to be connected to the GPIO of the Raspberry Pi, as shown above.
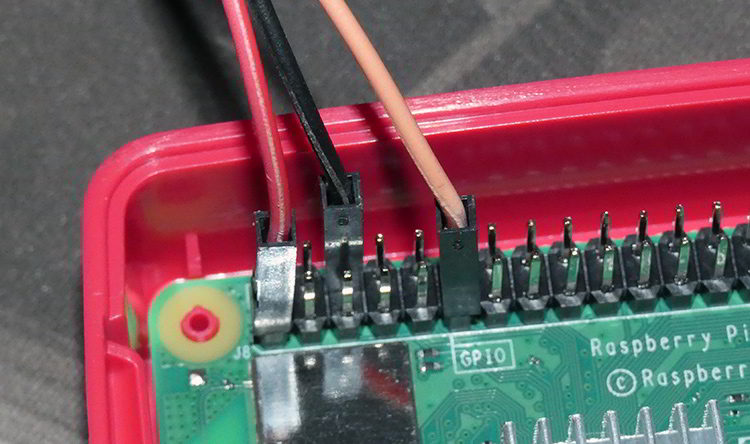
- There is a red power wire that goes to pin 1.
- The black wire is ground and goes to pin 6.
- The orange (sometimes yellow or white) is data and goes to Pin 11.
It’s pretty simple to hook up, if you need additional help, here’s a good guide to hooking up the AM2302.
Read the Temperature Sensor
We’re going to create a Go file on the Raspberry Pi to read the temperature from the sensor. I named it readsensor.go.
You will need to install Go on the Raspberry Pi to run this.
Next, you need to install the Go-DHT libraries from this repo.
go get github.com/MichaelS11/go-dht
This is a library I like to use because it’s incredibly simple and has worked reliably for me.
First, let’s just verify the functionality of the sensor. Let’s build our file from the top. Add the following to the header:
package main

import (
    "fmt"
    "github.com/MichaelS11/go-dht"
)
This will pull in the Go-DHT package and fmt to format the output.
Next, I’ll create a CONST to set the GPIO. Pin 11 is GPIO 17. You can use other GPIO pins if you like.
const GPIO = "GPIO17"
Next, we need to do three things for the temperature sensor:
- Initialize the GPIO Host
- Create a new DHT reader
- Read it
So in our main func, we’ll initialize it:
hosterr := dht.HostInit()
if hosterr != nil {
    fmt.Println("HostInit error:", hosterr)
    return
}
Then we’ll create our new DHT reader:
dht, dhterr := dht.NewDHT(GPIO, dht.Fahrenheit, "")
if dhterr != nil {
    fmt.Println("NewDHT error:", dhterr)
    return
}
Notice I’m using the GPIO we set in the const above, and calling NewDHT and setting the parameter to Fahrenheit. You can use Celcius if you choose.
Finally, we’ll read the sensor and output the results.
humidity, temperature, readerr := dht.Read()

if readerr != nil {
    fmt.Println("Reader error:", readerr)
    return
}
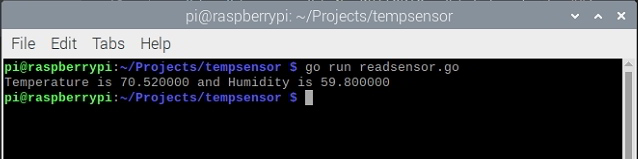
Awesome! It works. Now let’s prepare it for sending to an endpoint.
Send the Data with JSON
Now we’re going to add some packages to our imports:
import (
    "bytes"
    "encoding/json"
    "fmt"
    "net/http"
    "time"
    "github.com/MichaelS11/go-dht"
)
This will bring in the packages needed to send our data to an endpoint.
Next, we need to create a struct for our data. This is what we’ll be packaging up and sending to our endpoint.
type reading struct {
    TimeStamp   string
    Temperature float64
    Humidity    float64
}
This is the data that we’ll be sending.
And we’ll add another CONST here for our endpoint. This will be your URL to your server.
const Endpoint = "http://[YOUR DOMAIN or IP]:5000/reading"
OK, so in our struct above, we have a timestamp. We’ll create that at the top of our application:
timeStamp := time.Now()
Now, go down below your dht.Read function:
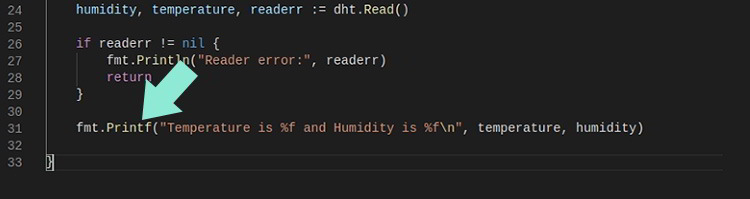
and replace the Printf line with this line:
newReading := reading{TimeStamp: timeStamp.Format("2006-01-02T15:04:05-0700"), Temperature: temperature, Humidity: humidity}
This creates a new struct with our reading.
If you want to output the reading to the console also, you can add the following:
fmt.Printf("Our Reading was: \nTemperature: %v\nHumidity:%v\n", temperature, humidity)
Now we create our request:
var requestBody, reqerr = json.Marshal(newReading)
if reqerr != nil {
   fmt.Println("Request error:", readerr)
     return
}
And then send that request as a POST to our endpoint.
resp, resperror := http.Post(Endpoint, "application/json", bytes.NewBuffer(requestBody))

    if resperror != nil {
        fmt.Println("Response error:", resperror)
        return
    }
Finally, we will create a defer to close the request:
defer resp.Body.Close()
And we’re done! Now we have a practical application to read the sensor and send the values to an endpoint.
You can view the full source code here to verify it.
Build Our API Endpoint
So for this setup, you can use pretty much any Linux or Windows virtual machine. I’m using an AWS Lightsail FreeBSD machine for this.
You’ll need to install Go on the machine unless you want to build the executable and send it over.
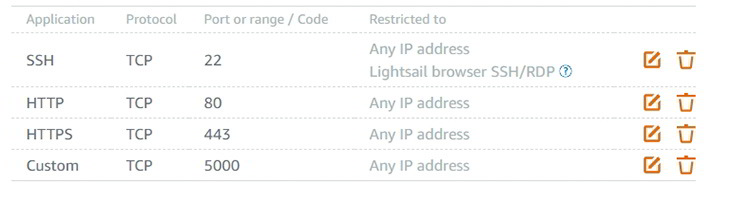
If you’re using LightSail, make sure to open up port 5000. This port will need to be opened on whatever firewall or service you’re using.
Here’s what our endpoint is going to look like.
It will be an application that:
- Hosts an API to catch the POST command sent from the Raspberry PI
- Stores the results in a SQLlite database
- Retrieves the last 10 of those results.
So let’s do it.
Setup Our Packages
We’ll need to install a couple of Go packages:
go get github.com/gin-gonic/gin
go get github.com/mattn/go-sqlite3
Then, create a file named reader.go or whatever you want it to be named.
At the top, let’s put in our packages:
package main

import (
    "database/sql"
    "fmt"
    "net/http"
    "github.com/gin-gonic/gin"
    _ "github.com/mattn/go-sqlite3"
)
We’re going to use the database/sql library to interact with our SQLlite database. For larger applications, you may want to use a larger scale database service. But for learning purposes and playing around, SQLlite does just fine.
Then we’ll use the FMT library to print our error messages nicely,
Gin will be handling our API calls, Then Matt’s go-sqllite3 library will handle interacting with our SQLite database.
Once again we’ll create a similar struct for our readings:
type Reading struct {
    TimeStamp   string
    Temperature float64
    Humidity    float64
}
Then, below that we’ll create a spot for our db instance:
var db *sql.DB
Next, let’s create a “Check” function to check for and report errors. It will look like this:
func Check(e error) {
    if e != nil {
            panic(e)
    }
}
It’s not much, but it will do for now.
Setup Our Database
Next, we’re going to create an init function, so we can initialize and connect to our database on startup.
func init() {
    db, _ = sql.Open("sqlite3", "./readings.db")
    statement, prepError := db.Prepare("CREATE TABLE IF NOT EXISTS reading (TimeStamp TEXT, Temperature NUMERIC, Humidity NUMERIC)")
    Check(prepError)
    statement.Exec()
}
Let’s take a look at this.
First, we’ll connect to the database:
db, dbError = sql.Open("sqlite3", "./readings.db")
Check(dbError)
Here we’re calling sql.Open and specifying sqlite3, and a path to our database. If it doesn’t exist, a new one will be created. Then we’ll check for an error.
Next, we have a prepare statement. It says if the reading table doesn’t exist, we’ll create it. Note we’re adding a timestamp, temperature, and humidity.
Then, of course, we call check again to make sure there weren’t any errors. Then call statement.Exec() to execute our SQL query.
Store Our Data
Now we need to set up a way to store data into our database. It’s easy to do and less code than you might think.
First, let’s create a function to save to our database:
func saveToDatabase(TimeStamp string, Temperature float64, Humidity float64) {

    statement, err := db.Prepare("INSERT INTO reading (TimeStamp, Temperature, Humidity) VALUES (?,?,?)")
    Check(err)

    _, err = statement.Exec(TimeStamp, Temperature, Humidity)
    Check(err)
}
So we’re creating a func to store data that takes the timestamp, float, and humidity as inputs.
Then we call db.Prepare() to prepare a statement. We do an error check on the prepare.
Then, we call statement.Exec() and insert our data to be saved. Simple and easy.
Now we’ll create another function named tempData:
func tempData(c *gin.Context) {
    // pull from original post and put into our struct

    if c.Request.Method == "POST" {

        var r Reading
        c.BindJSON(&r)

        // save to database here
        saveToDatabase(r.TimeStamp, r.Temperature, r.Humidity)

        c.JSON(http.StatusOK, gin.H{
            "status":  "Posted!",
            "Message": "This worked!",
        })
    }
}
In this function, we pull the POST data from the gin context. We create an instance of our Reading struct and bind our JSON to it. Then we store the data from the JSON in our database by passing it to the saveToDatabase function we just created.
Then we return a JSON file with a 200 OK status and some messaging you can add in case you want to call that back at some point.
Get the Last Ten Records
The next function we need to make will get the last ten records from our database.
func getLastTen() []Reading {

    // query the database for readings
    rows, _ := db.Query("SELECT TimeStamp, Temperature, Humidity from reading LIMIT 10")

    // create some temp variables
    var TimeStamp string
    var Temperature float64
    var Humidity float64

    // make a slice
    lastTen := make([]Reading, 10)

    // insert data into slice
    for rows.Next() {
        rows.Scan(&TimeStamp, &Temperature, &Humidity)
        lastTen = append(lastTen, Reading{TimeStamp: TimeStamp, Temperature: Temperature, Humidity: Humidity})
    }
    // return it
    return lastTen
}
So here we have a func that accepts no input but returns a slice of readings.
First, the select statement is created.
Then we create temporary variables.
Then we’ll create a slice named lastTen.
We’ll use a for loop to iterate through the rows returns, scan the data into the temporary variables, then append them to our slice.
Finally, we return lastTen from the function.
Setup Our API
For the last step, we’ll set up our API.
So we’re going to use Gin for our API endpoint. Our API is so simple we could write it out by hand, but by using Gin we can expand it and make it more robust later.
r := gin.Default()
This creates a default Gin router. Then we’ll great the endpoint that returns our last ten readings:
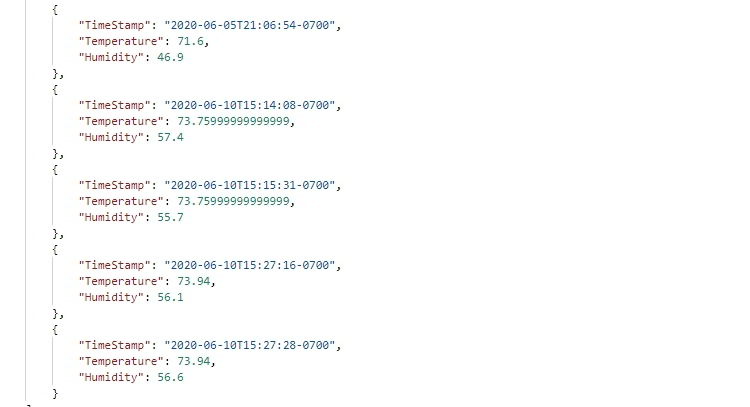
r.GET("/reading", func(c *gin.Context) {
        lastTen := getLastTen()
        // stuff into a JSON object and return it
        c.JSON(200, gin.H{"message": lastTen})
    })
Here we’re creating a route to capture any GET commands sent to /reading. We then make a call to the getLastTen() func we just created, and serialize that slice into JSON and return it with a 200 OK message.
For input, we add the following:
r.POST("/reading", tempData)
This captures any POST commands to /reading and directs it to the tempData function we created a while back.
Finally, we start the API.
r.Run(":5000")
And, we’re done! You can view the full source code here.
Once you start this service, you can accept POST commands from your Raspberry Pi, and store them in the database.
Conclusion
This was a pretty lengthy tutorial, I know. Here’s what we learned:
- How to retrieve the temperature from a sensor
- How to send that data in JSON
- Build an API endpoint to receive it
- Store the data in SQLite database
It’s a lot of work upfront that helps you understand how IoT works, and how you can build your own system. If you don’t want to go through the tutorial, you can watch me put it together in a stream or download the source code here.
I’ll be adding to this project in the future and tightening things up, making it into a real product. I’ll be streaming it on Twitch, so follow me if you’re interested in watching!
If you decide to build this or add on to it, let me know!
Helpful courses to learn more:
Want to become an expert Go programmer?

You can boost your skills in a few weekends by taking these high quality Go courses taught by top experts!
We have over 30 hours of Go courses you can take now! You can try it for 10 days free of charge.
Click here for a free trial!

Skip the hype. The newsletter that keeps you in the know.
AI news curated for engineers. The AI New Hotness Newsletter is what you need.
Zero fluff. Just the research, tools, and infra updates that actually affect your production stack.
Stay up to date on AI for developers - Subscribe on LinkedIn