


How to Install Drupal on Raspberry Pi

Jeremy Morgan 
Dec 29, 2012 - 4 min read
Last Update: Dec 31, 2022

Do you want to install Drupal on your Raspberry Pi? It’s a lot easier than you might think, and this tutorial will walk you through the details of putting this great system on your Pi.
What you need to do first
First you’ll need the following:
- Web Server Software such as Apache, Nginx
- PHP 5.2.5 or higher (5.3 recommended)
- MySQL 5.0.15 or higher with PDO
You should have all these set up and configured already. If you need to, refer back to How to set up a Raspberry Pi Web Server if you need to.
You will also need to Install PHP with GD support. This is a simple apt-get command:
sudo apt-get install php5-gd
Get Drupal
For this tutorial we’re going to be using Drupal 7.18. The easiest way to get it on your Pi is to SSH into it or open a prompt and type the following:
cd /var/www sudo wget http://ftp.drupal.org/files/projects/drupal-7.18.tar.gz
This will download the tarball, then unzip it:
tar xvzf drupal-7.18.tar.gz
This will create a folder called /var/www/drupal-7.18 which I just rename to “drupal”
sudo mv drupal-7.18 drupal
Now we have our files extracted.
Create a MySQL database and account
You’ll probably want to set up a separate MySQL database and account for this. We’re going to be doing it at the MySQL prompt, but don’t get intimidated, it’s really easy.
Here’s how you do it.
Log into the MySQL server using the account you created when you installed it:
mysql -u root -p
Create a database (name it whatever you want):
create database drupal;
Now create a database user
CREATE USER ‘yourusername’@‘localhost’ IDENTIFIED BY ‘yourpassword’;
(Please don’t use the exact phrase above, create your own secure username and password).
Now that we have a Database and username created we need to associate them:
GRANT ALL on drupal.* TO ‘yourusername’@‘localhost’;
This will grant this user the ability to modify the database as needed.
exit;
Wasn’t that easy? Using MySQL from the prompt is pretty scary at first, but it’s really simple stuff when you get used to it.
Drupal Install
The first thing you’ll want to do is copy the default settings for your site. You can change this later.
sudo cp sites/default/default.settings.php ./sites/default/settings.php
Then Load up a web broswer with the IP address of your Raspberry Pi and point it that folder you installed Drupal in. For me it was:
http://192.168.254.18/drupal/
Since you haven’t yet installed Drupal it will take you to an install screen.
Step 1: Select an installation profile
For this we’ll choose “Standard - Install with commonly used features pre-configured”
Click “Save and continue”
Step 2: Choose Language
Most likely English, which is built in.
Verifying Requirements
You shouldn’t see any problems here. If you get a message saying Drupal cannot modify your files, run the following command:
sudo chmod -R a+w /var/www/drupal
This will make your files writeable again and you’ll should see the next screen.
Database configuration
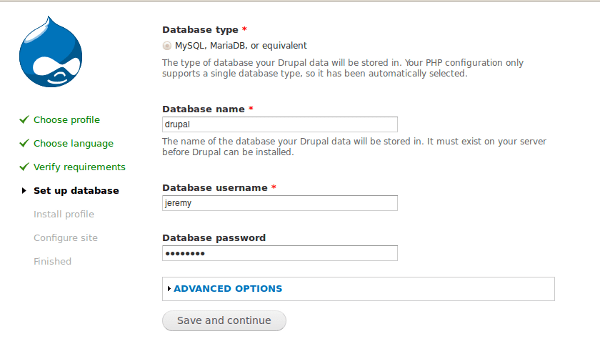
Here is where we will put in our database information we created earlier.
Database Name- The name you gave your database (I called it drupal)
Database username - the name of the account you created
Database password - the password of that username
Click save and continue. This may take a little while, as it creates your database and installs modules.
Configure Drupal
Now that it’s installed (hopefully) you should see a configuration page.
For your site configuration fill in the following info:
Site name - Jeremy’s Drupal Sandbox (or whatever you want to call it)
Site e-mail address - Your email Address
Password - A secure password, different from your database password!
Default Country - Where you live.
Default Timezone - Your time zone
Then again click Save and continue
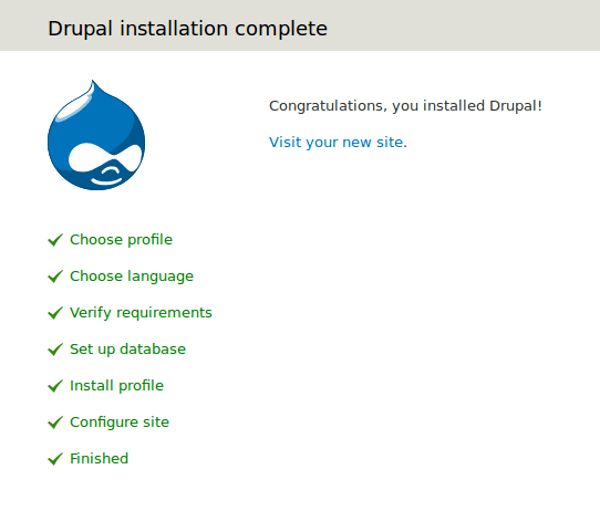
You can now view your new website! Feel free to browse around and play with it, it’s the only way to learn.
Conclusion
I hope this has helped you get Drupal installed on your Raspberry Pi. I noticed it’s a little sluggish on mine, but it’s to be expected. It actually isn’t too bad for development, but I wouldn’t reccomend it for a production site.
The point of the Raspberry Pi is education, so tutorials like this show the power this device is giving you, being able to host a Drupal site on this tiny thing is amazing.
Good luck with your projects, and if you have any issues, Let me know!
Want to learn more about the Raspberry Pi? Check out the Raspberry Pi for Developers course!